

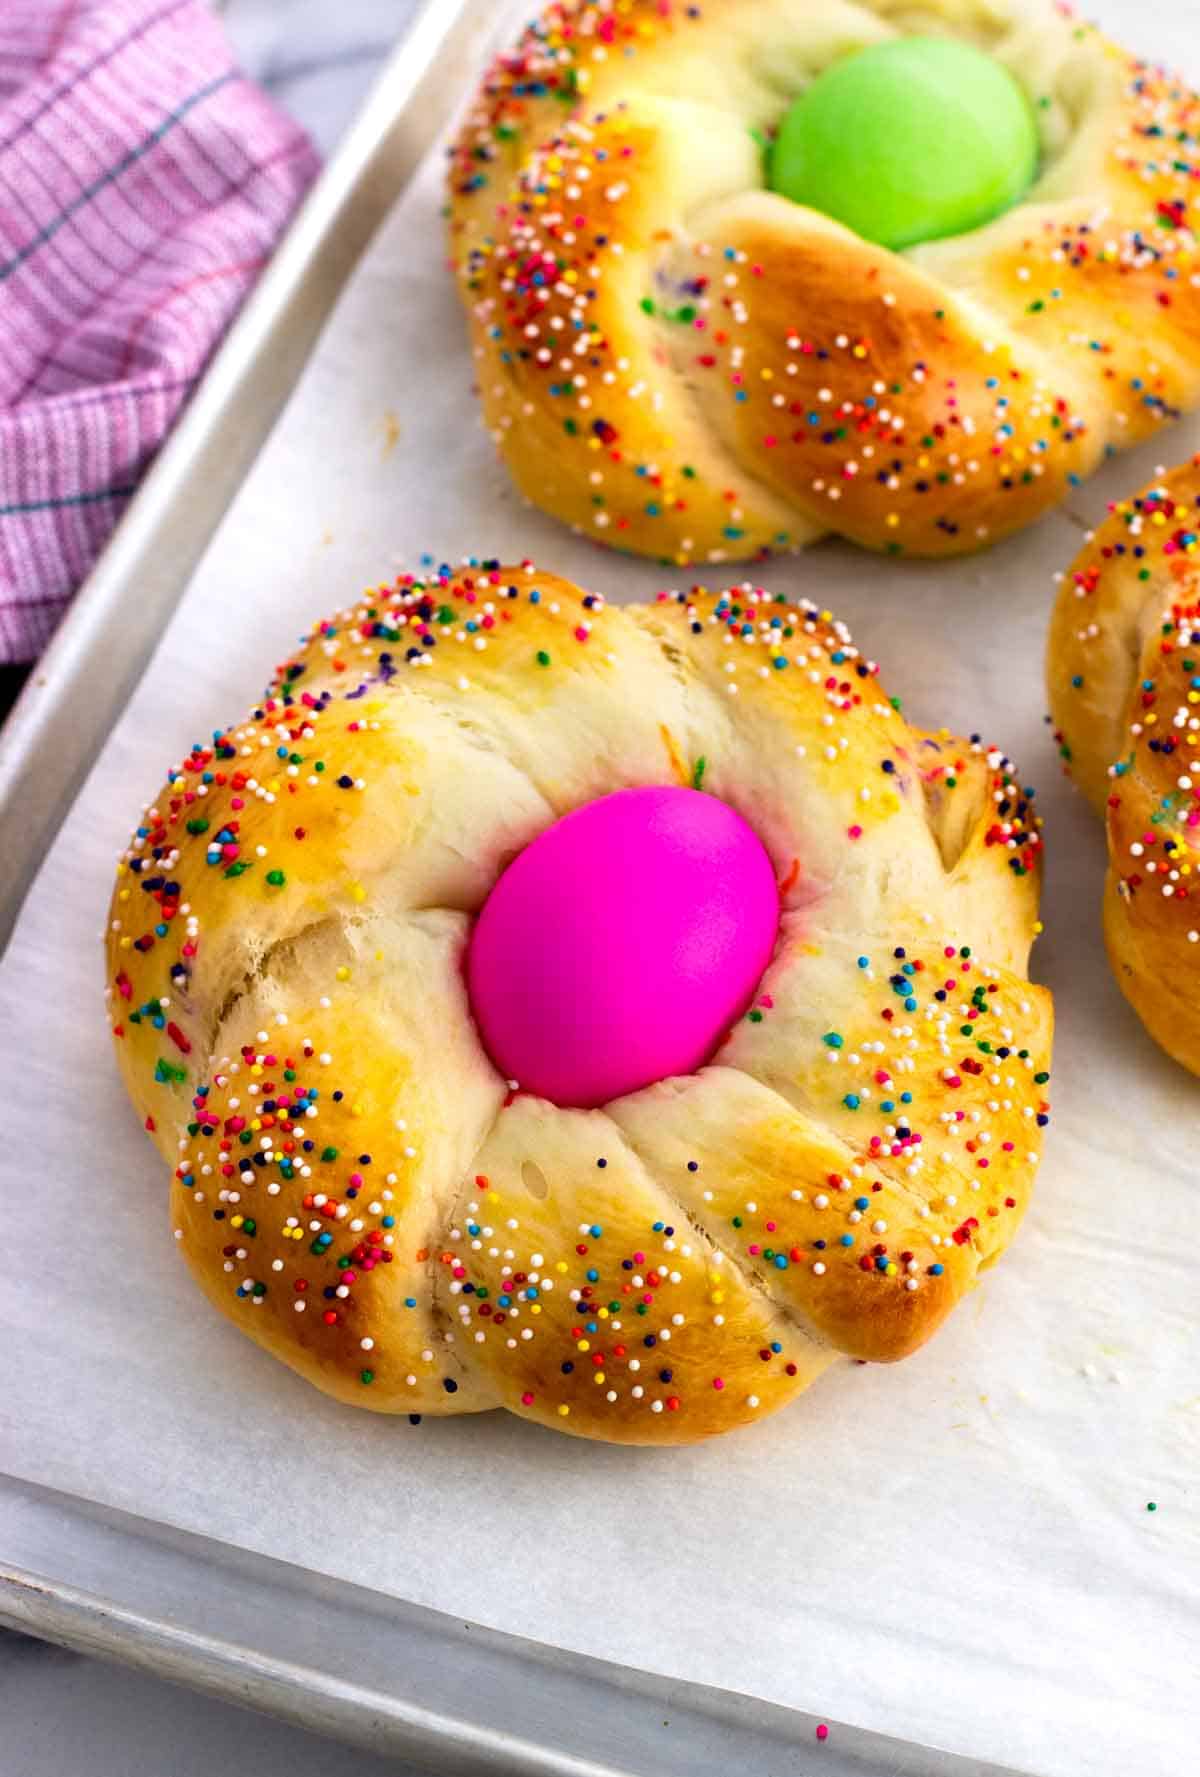
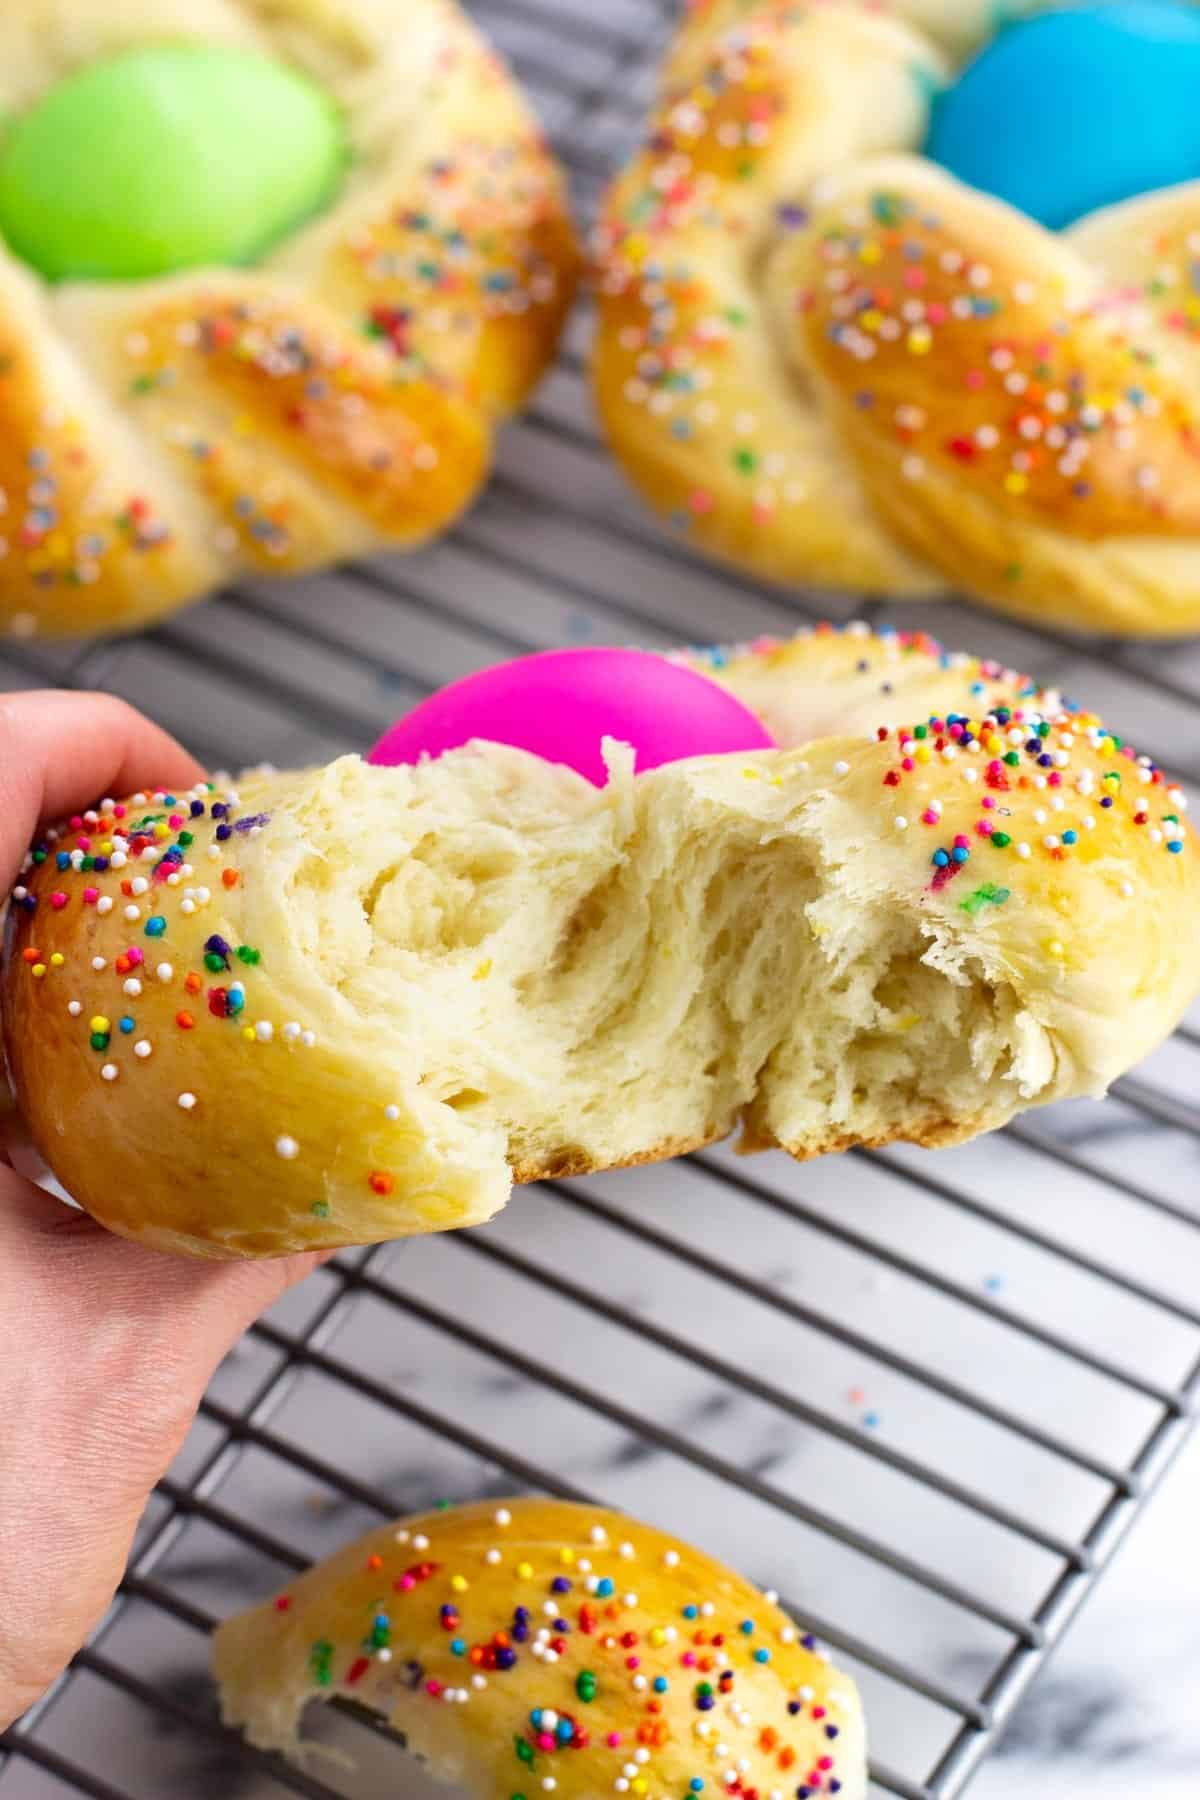
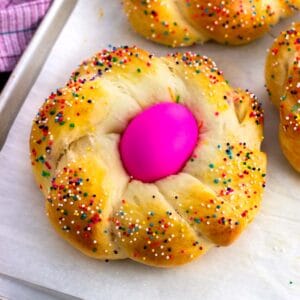
Italian Easter Bread, also known as Pane di Pasqua, is a rich and fluffy yeasted sweet bread traditionally twisted into rings and adorned with a dyed Easter egg. While the variations may differ, this version features a balance of lemon and anise flavors for a perfect, just-sweet-enough springtime treat.
Italians don't have it easy when it comes to cooking traditional recipes for Easter. Between pizza rustica and this Italian Easter bread alone, you'll need 18 eggs and will spend quite a bit of quality time in the kitchen prepping and assembling everything in stages.
Good thing both of these recipes are 100% worth the effort (and are eaten once a year!).
This recipe is a close adaptation of my great aunt's recipe, which we are fortunate to have written down on paper many years ago. Whereas she kneaded in citron, I omit and bump up the lemon zest (personal preference!) and assemble the dough in a stand mixer for convenience.
Jump to:
Why You'll Love This Recipe
Step-by-Step Guidance - If you're intimidated by baking with yeast, please don't be! This Italian Easter bread recipe is incredibly detailed to set you up for success.
Perfect Texture/Flavor - This anise-flavored yeasted bread has the most amazing soft and fluffy texture, similar to other enriched breads like challah and brioche. The braided dough also has a hint of lemon and just enough anise in its flavoring to be present but not overpowering.
Make-Ahead Tips - With two rises required, there's no getting around a lengthy total recipe time. I've also included instructions on starting the process the night before to get one rise out of the way and save time on the day-of baking.
Recipe Ingredients

- Flour: All-purpose flour is used here, and a lot of it. While it's ideal to measure flour in grams for precision, if going by cups be sure to use the scoop-and-level method detailed in the recipe card below to prevent adding too much to the recipe.
- Yeast: One envelope (2.25 teaspoons, 0.25 ounce) of active dry yeast is used here. Make sure it's fresh (not expired/old) for the best rise.
- Eggs: While the two eggs required in the dough itself are pictured above, you'll need six additional dyed Easter eggs if you'd like to place one in the center of each ring before baking. The center eggs are optional.
- Lemon zest: One tablespoon is used, about one large lemon.
- Anise extract: This recipe calls for anise extract found in the baking aisle, though anise oil or anise seed would be fine substitutes (see more on this in the FAQ section below).
Step-by-Step Instructions
There's no getting around the fact that there are a lot of steps in making Italian Easter bread. Thankfully the steps aren't that difficult, rather they just take time. This is an overview - all of the details are in the recipe card at the bottom of the post.
See the section below the instructions on a way to simplify the process by starting this bread the night before.
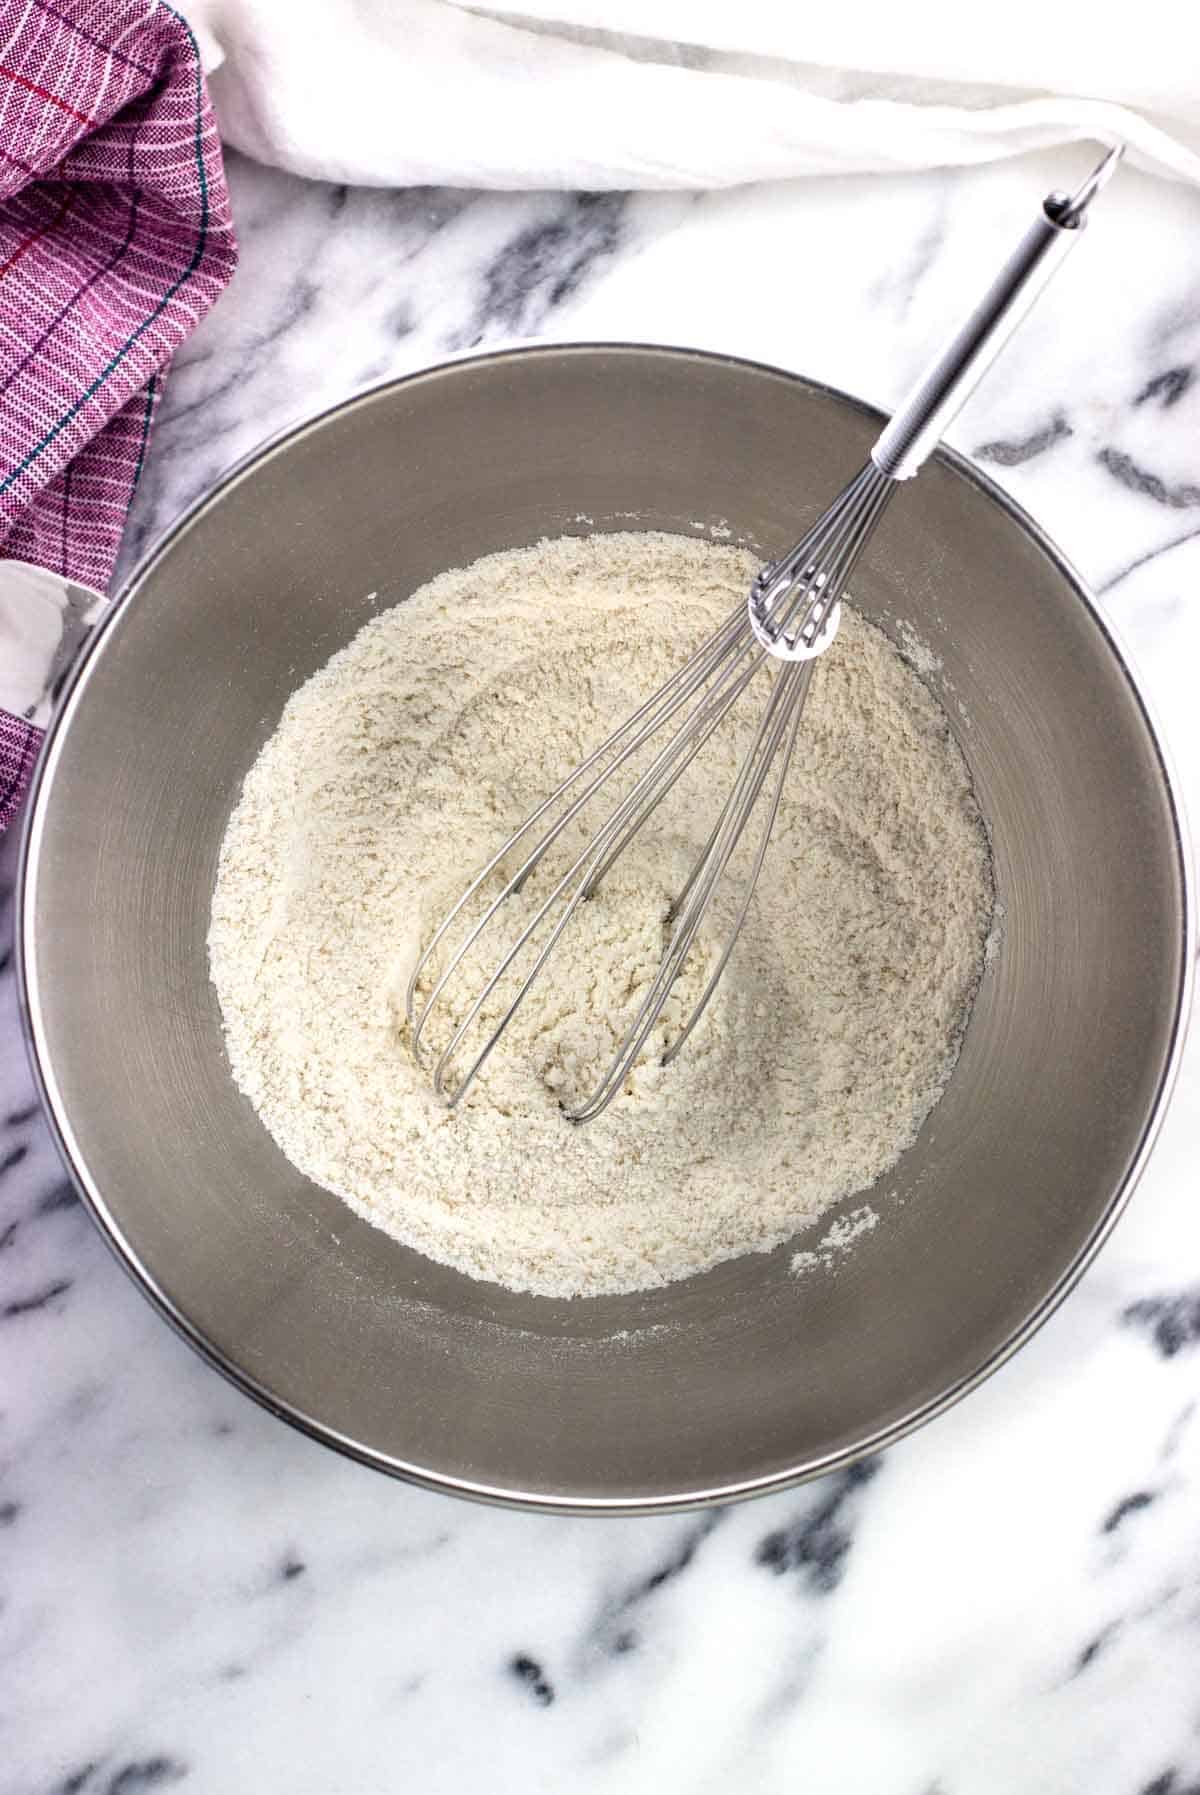
- Step 1: Whisk together the sugar, yeast, salt, and one cup of flour in the bowl of a stand mixer.
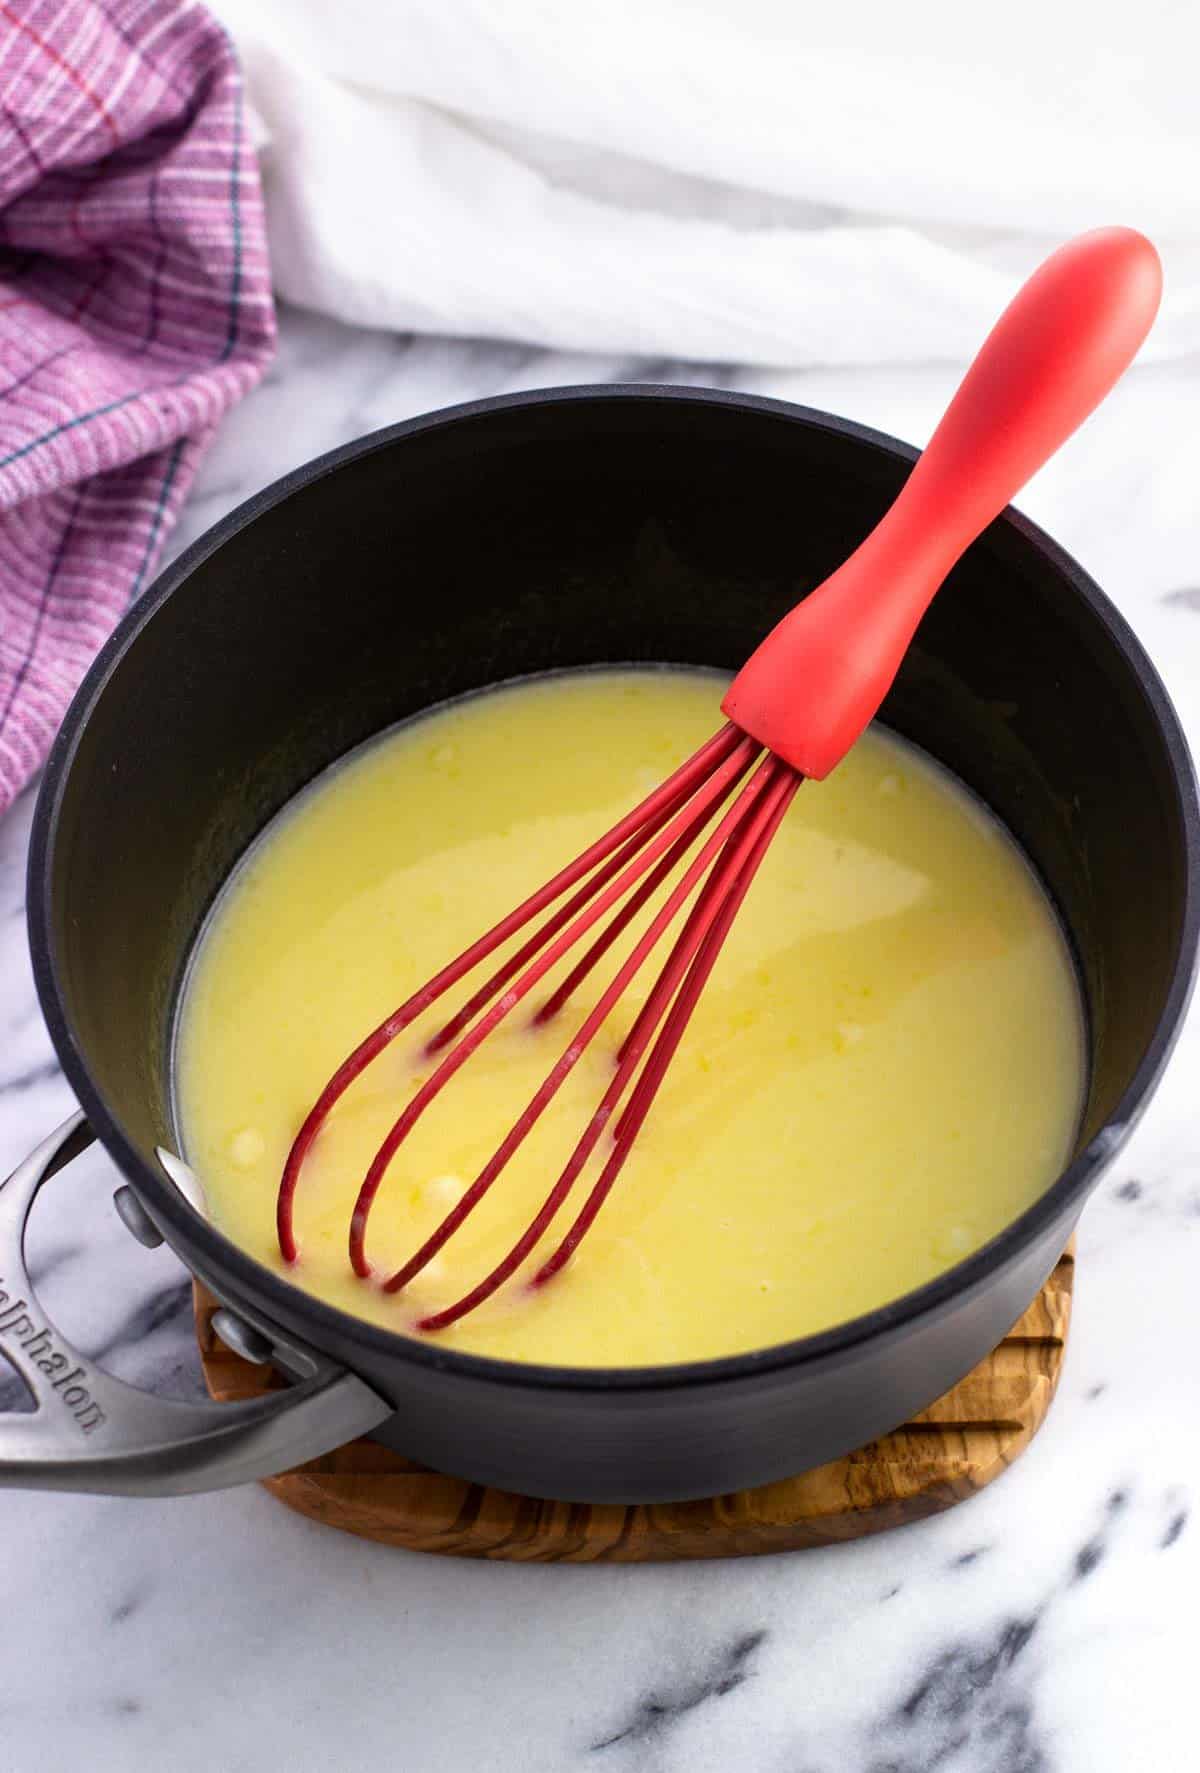
- Step 2: Heat the milk and butter until melted and the liquid reaches about 105-115°F. If it's too hot, take the pan off the heat and let it cool until it's in this range.
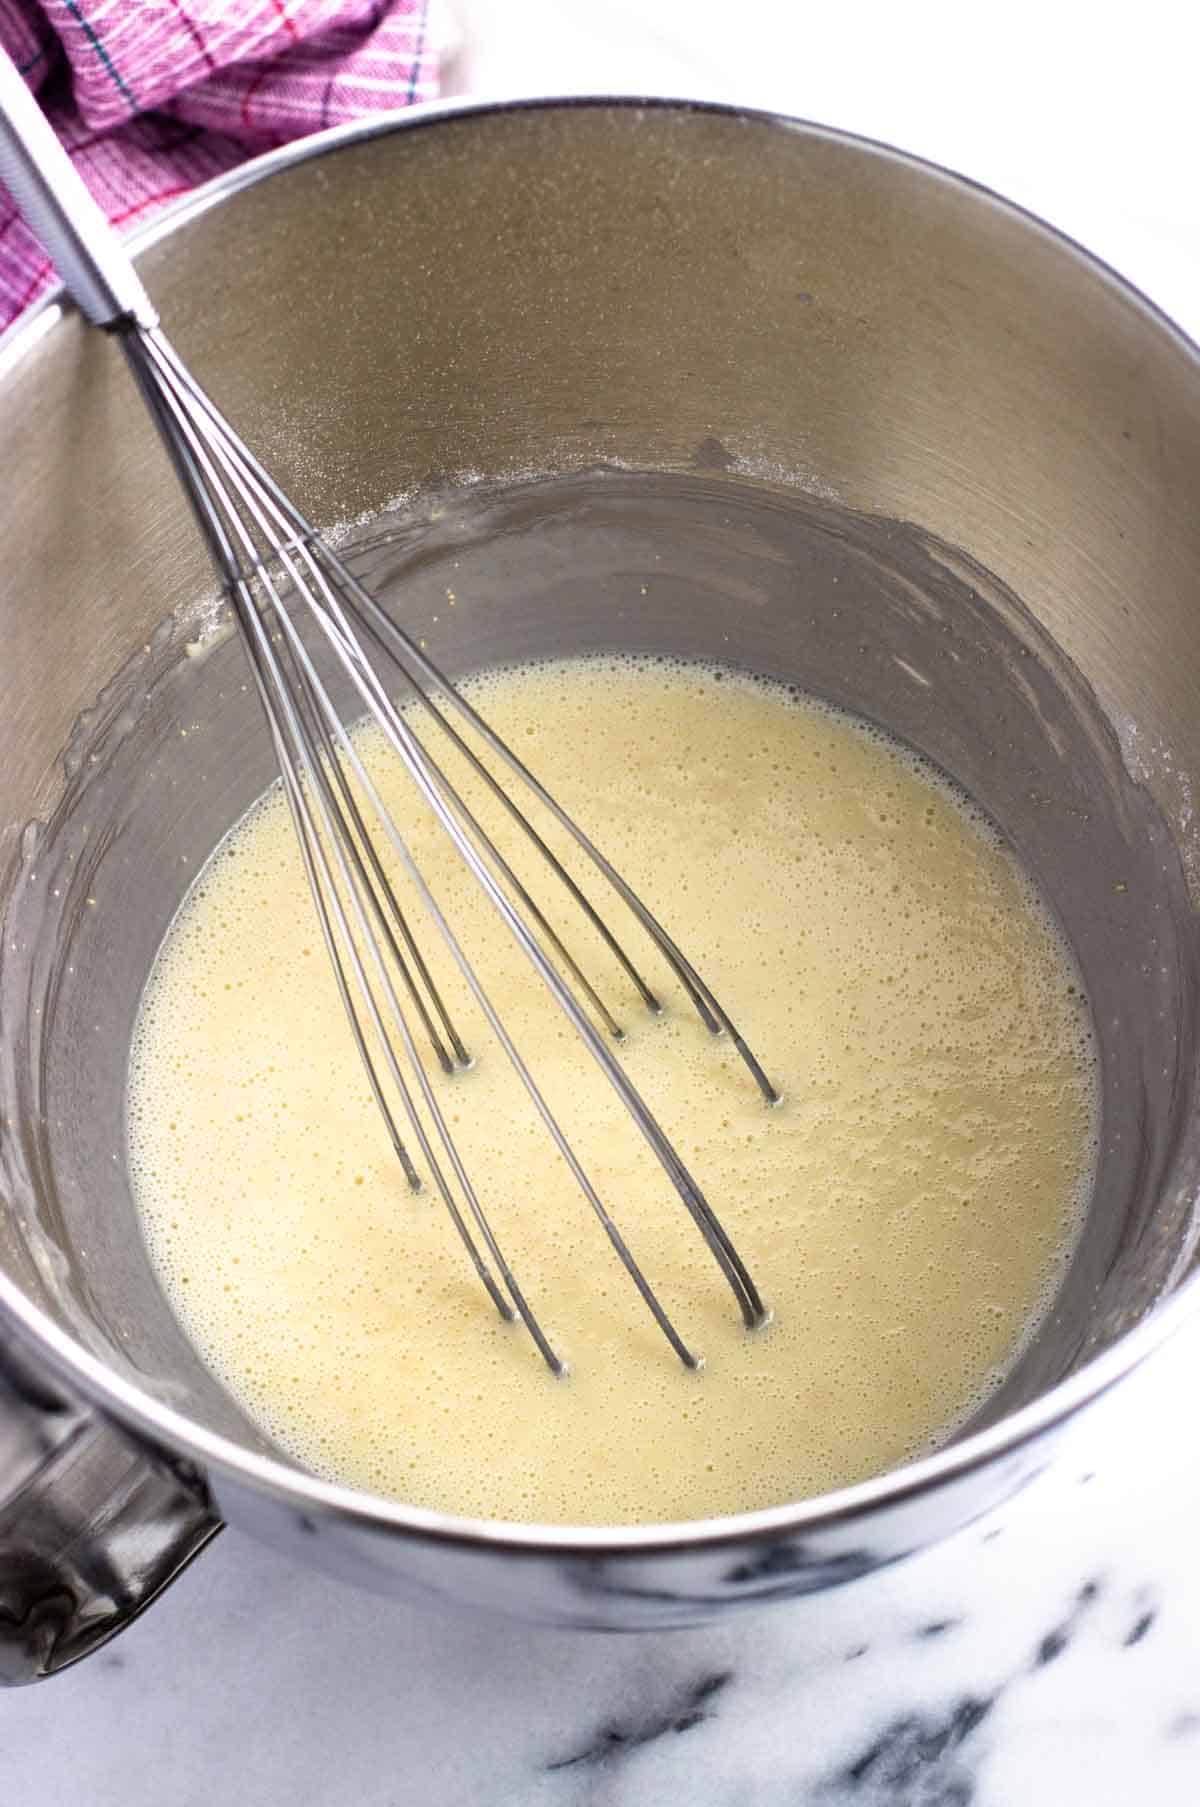
- Step 3: Pour the milk/butter into the stand mixer bowl over the dry ingredients. Whisk it well to combine as it froths up.
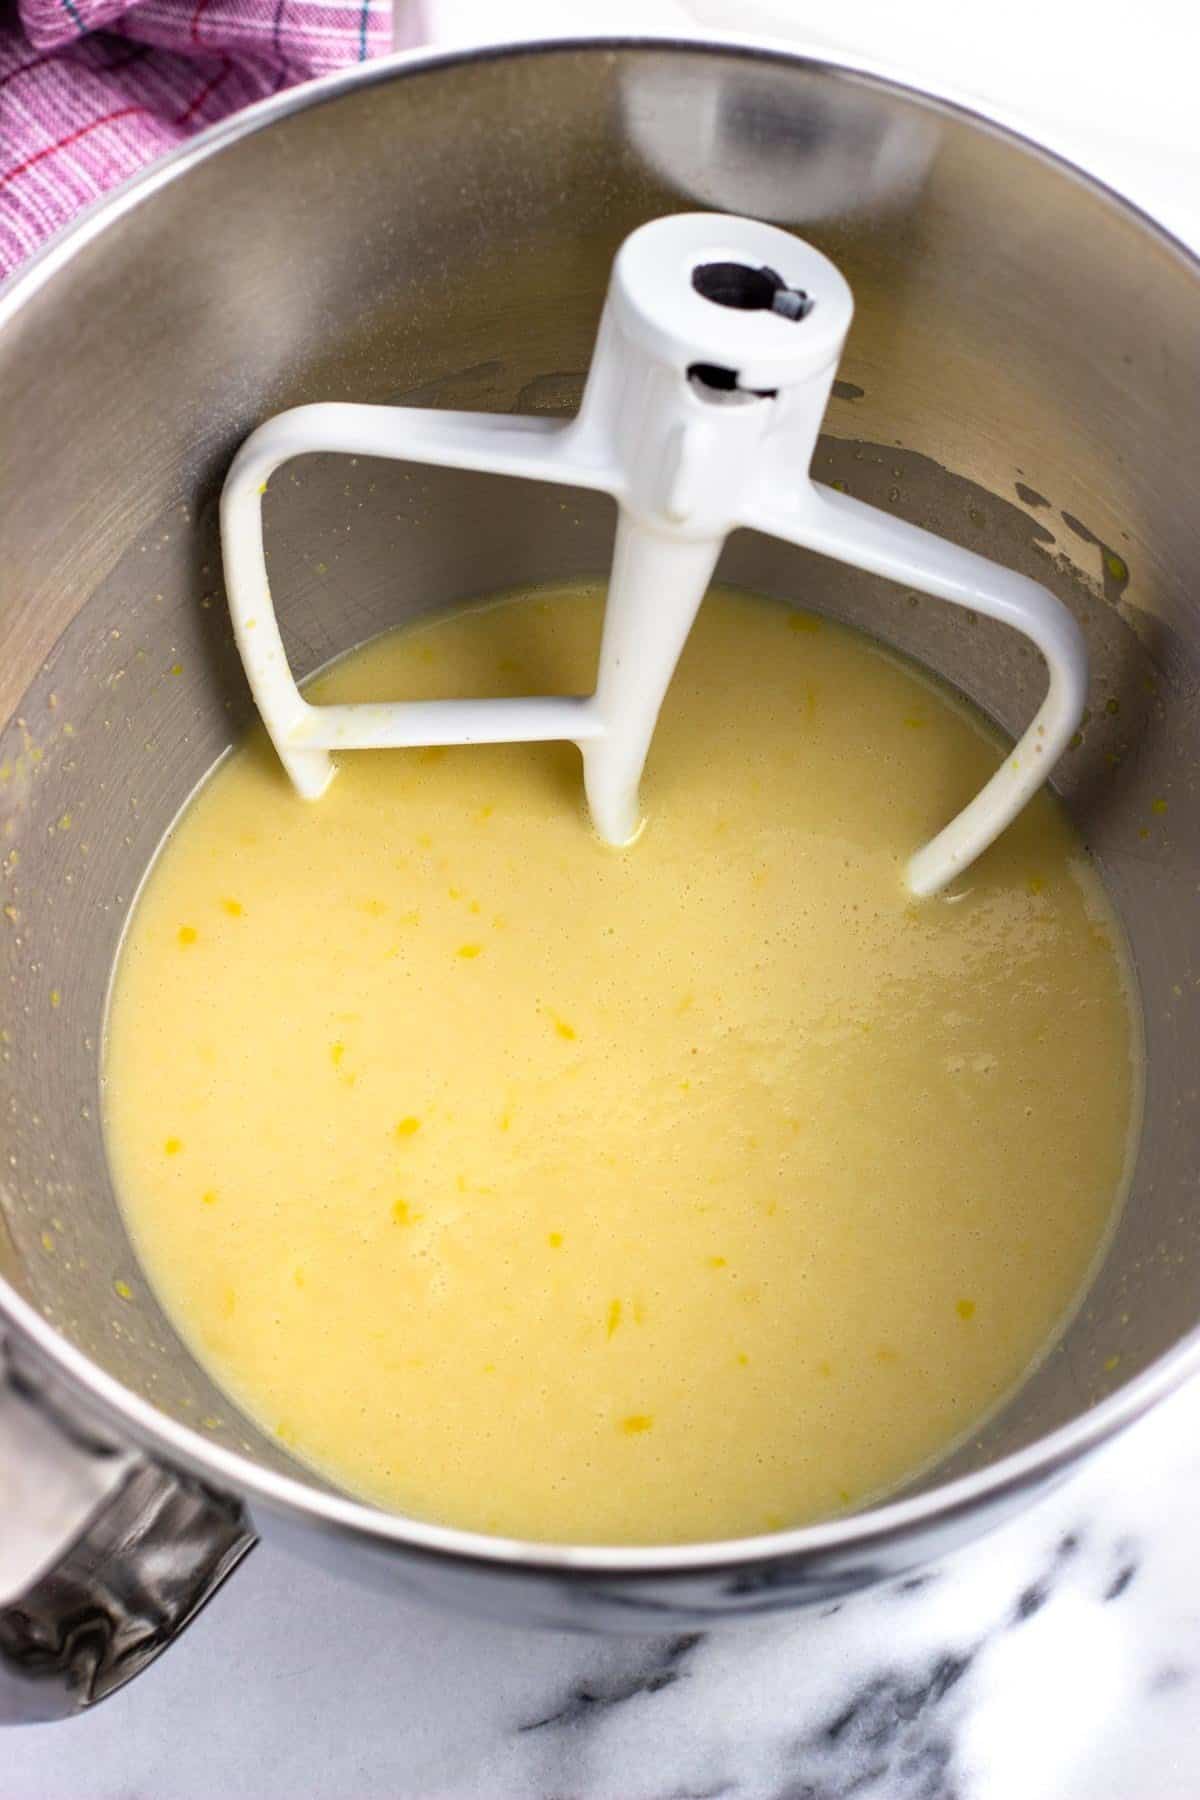
- Step 4: Add two eggs, lemon zest, and anise and vanilla extracts. Using the paddle attachment, mix for two minutes.
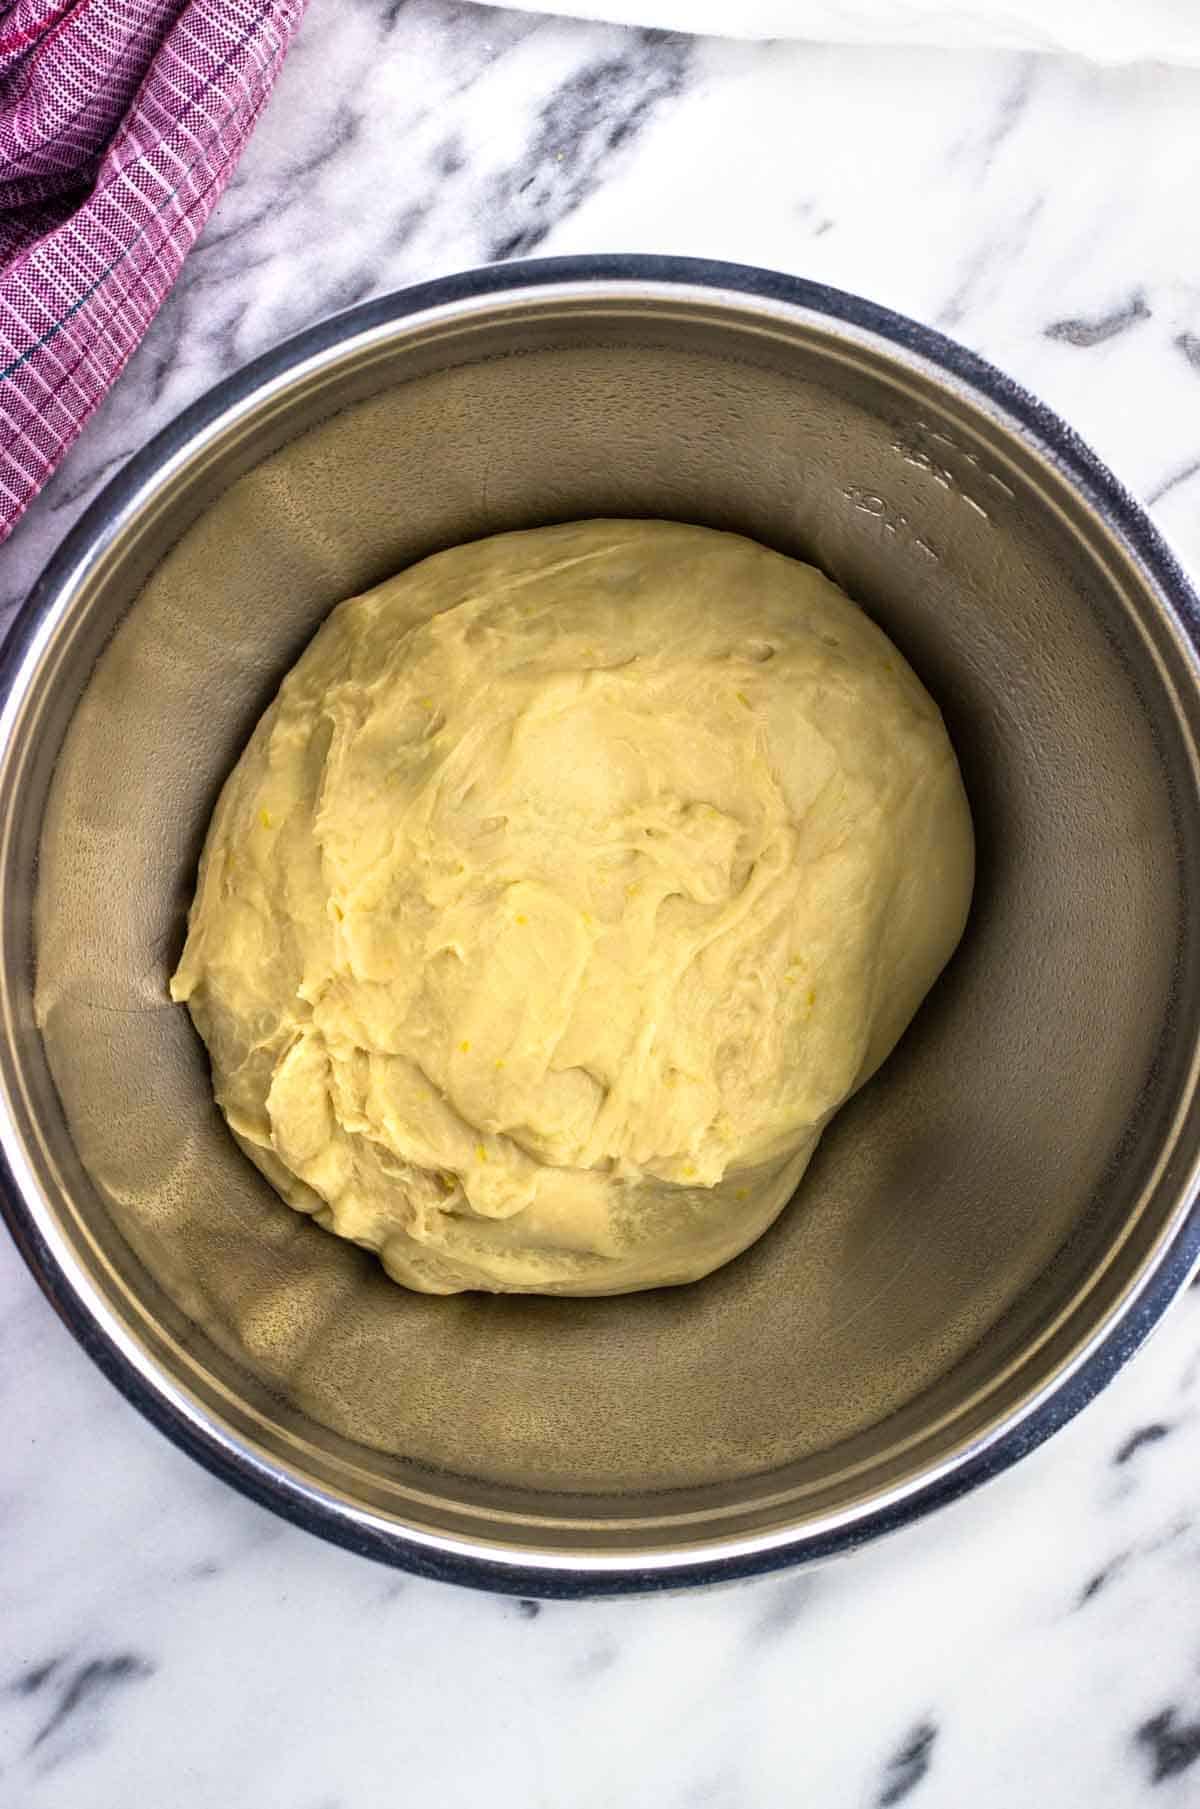
- Step 5: Add three cups of flour. Use the dough hook to knead for 10 minutes as a ball of dough forms. Add a couple of extra tablespoons of flour, as needed, until the dough is only slightly sticky.

- Step 6: Place the ball of dough in a large greased bowl, cover, and let rise in a warm place until doubled, about one hour.

- Step 7: Punch down the dough and turn it out onto a work surface. Knead it briefly, then let it rest for a few minutes. Slice it into twelve equal pieces.
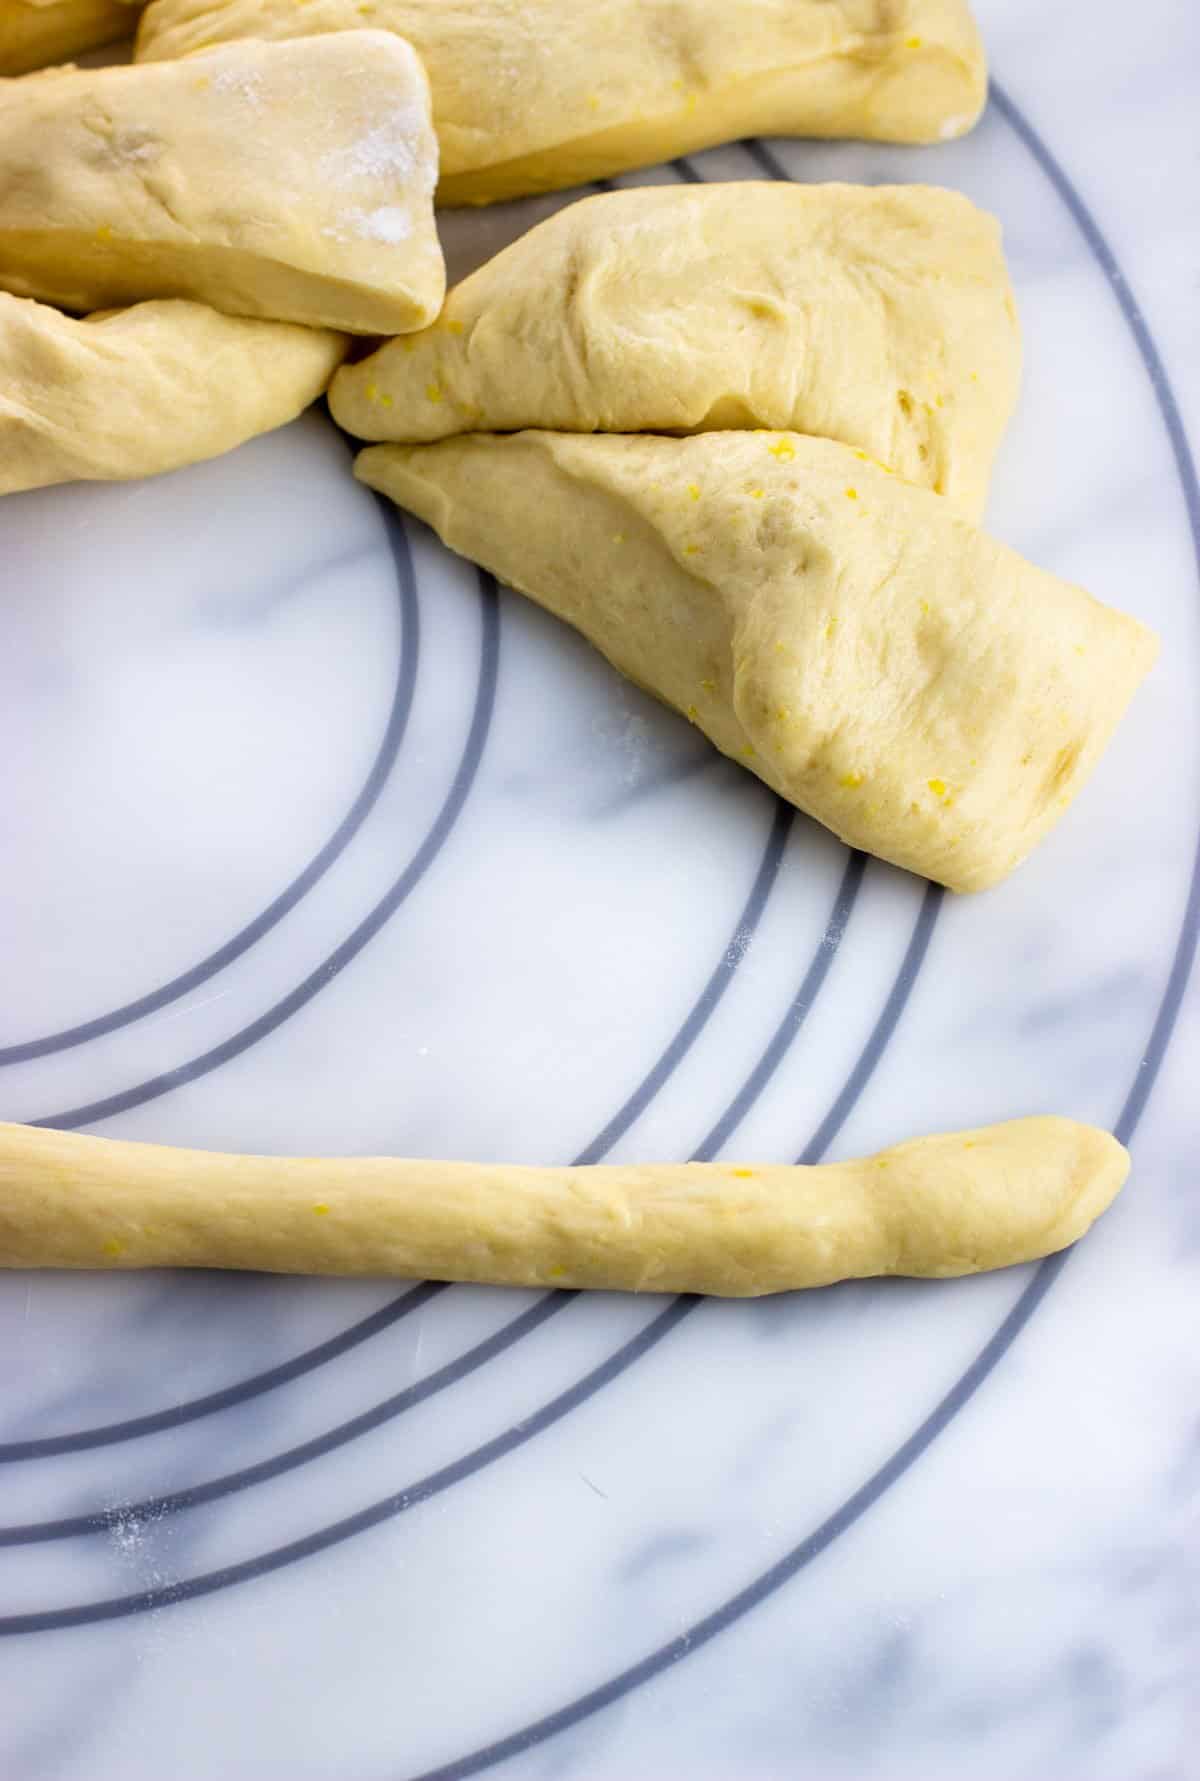
- Step 8: Roll each piece into a thin rope about one-inch or so wide and just over a foot long.
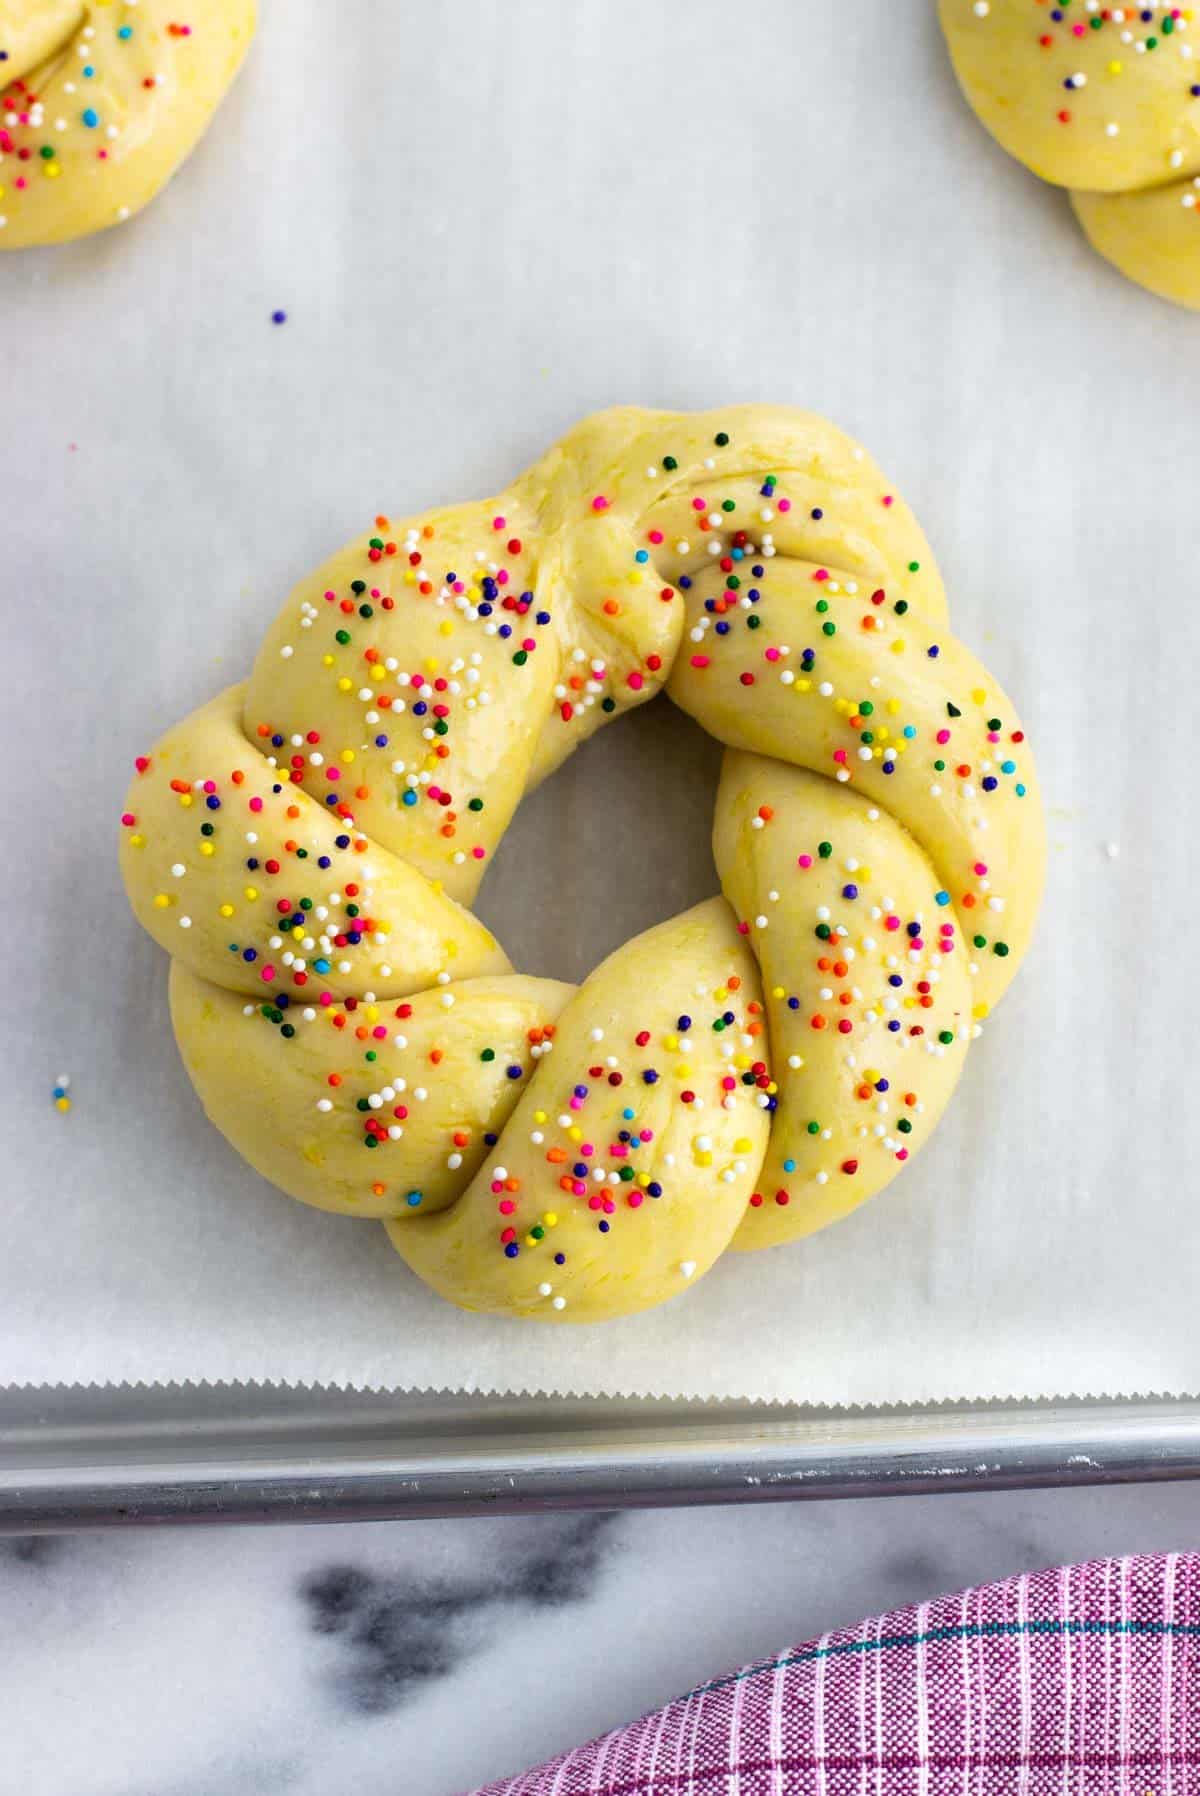
- Step 9: Place two ropes next one another and pinch together the ends of one side. Twist the ropes around one another, form a ring, and pinch together the remaining ends. Let rings rise again until doubled, then brush with egg wash and sprinkle nonpareils.

- Step 10: Add a dyed egg to the center of the ring (if you like) then bake at 350°F until golden-brown, around 23-25 minutes.
Adding Dyed Eggs to Easter Bread
While they create a show-stopper of an Easter table centerpiece, it's completely optional to add dyed eggs to Easter bread. In fact, I'm not a big fan of soft or hard boiled eggs in general so my preference is to omit the dyed eggs and simply bake Italian Easter bread without.
This recipe yields six small-ish rings, so you'll need six dyed eggs for decoration. You can also only add a few eggs, or not dye the eggs at all.
If you are adding decoration eggs, keep these things in mind:
- Egg doneness - The dyed eggs are raw, and with a 23-25 minute bake time they'll end up somewhere between a soft- and hard-boiled consistency.
- Use food-safe dyes - If coloring the eggs, be sure to choose a method of dyeing that uses food-safe dyes. The brand of kit I've used since I was little, Paas, calls out that its dyes are food-safe, as does the kind I found at Target. Most should be, but it's worth a double-check.
- Prevent color bleeding - Keep the egg wash away from the dyed eggs as best you can to prevent color bleeding onto the dough. That said, despite my best efforts I've found blue Easter egg dye for whatever reason to bleed more than the other colors.
- Important food safety information - Store the bread rings with the eggs in the refrigerator (or remove the eggs after baking for refrigeration). Don't leave them out for longer than two hours at room temperature after baking. Soft-ish boiled eggs generally keep for two days refrigerated in the shell, so discard them after that.

Make-Ahead Method
Italian Easter bread is best when it's freshly-baked, but its lengthy process can jam up an otherwise busy baking and cooking time on Easter morning.
Enter: cold fermentation.
This is when you allow the dough to rise over an extended period of time under refrigeration, usually for one of the rises or the other (not both).
This recipe lends itself very well to cold fermentation, and is a method I use frequently for Italian Easter bread. The night before I want to bake this bread, I make the ball of dough, let it sit to rise at room temperature for a few minutes, and then transfer everything to the refrigerator. There it will rise for 8-12 hours, ready to continue with the shaping, second rise, and baking the following morning.
There is a risk of over-proofing with this method, though, so you'll have to think about timing as I wouldn't leave it for much longer than 12 hours. King Arthur has lots of information about cold fermentation if you're curious to learn more.
Expert Tips and Tricks
- Be efficient with time. As Italian Easter bread dough contains eggs and requires two rises, you'll want to be as efficient as possible when it comes to proofing the dough so it isn't out at room temperature for longer than it needs to be. An optimally-warm location, such as a preheated-then-turned-off-and-cooled-down-some oven or over top of a running dishwasher or dryer, will help the dough rise speedily.
- Keep an instant-read thermometer handy. Here I use it to ensure the milk/butter is around 110°F before adding it to the yeast, check the temperature of my warm oven before proofing the dough to see that it's in the mid-70°Fs (and not too hot as to kill off the yeast), and even check the baked bread itself for perfect doneness when the internal temperature reaches 190°F.
- Avoid dough shrinkage. After kneading the dough after its first rise, you'll want to let it rest for several minutes or so before rolling the sections into ropes. This rest period allows the gluten to chill out and become less tough, which will let you form ropes without them springing back and shortening.
Recipe FAQs
Yes - Anise oil or whole/ground anise seed can be substituted in. Use less anise oil as it's considerably more concentrated than extract. I experimented with whole anise seeds in Italian anise cookies and prefer more than the basic 2:1 substitution guidance. I'd use 1 ½ Tablespoons of lightly crushed or ground anise seeds here in place of 1 ½ teaspoons of anise extract.
No - Anise liqueurs (Sambuca/Anisette) are more dilute and would require too much liquid to reach an appropriate level of flavor. This would make the dough too wet, so I would not use them here.
Without dyed eggs - Let the breads cool completely, then wrap in plastic wrap and place in an air-tight container at room temperature for up to 3 days. You can also freeze them this way.
With dyed eggs - Refrigerate the entire breads (or remove the eggs and refrigerate those) within 2 hours of them coming out of the oven. Do not store breads with the dyed eggs at room temperature.
Yes, though keep in mind the colors of the rainbow nonpareils will likely bleed a bit in the process. Wrap the bread rings in foil and place in the center of an oven heated to around 325-350°F. Reheat until just fragrant and warmed throughout, around 15 minutes or so.
More Italian Easter Recipes


Did you enjoy this recipe? I’d love for you to leave a star rating and a comment review in the recipe card below!
Italian Easter Bread
Ingredients
For the bread:
- 1 0.25-ounce packet (2 ¼ teaspoons, 7g) active dry yeast
- ½ cup (100g) granulated sugar
- ½ teaspoon salt
- 4 - 4 ¼ cups (500 - 531g) all-purpose flour divided
- 1 cup (240 ml) milk (I use 2%)
- 6 Tablespoons (85g) unsalted butter room temperature and cut into pieces
- 2 large eggs
- 1 Tablespoon lemon zest (amount from one large lemon)
- 1 ½ teaspoons anise extract
- 1 teaspoon vanilla extract
For decoration:
- 1 large egg yolk plus 1 teaspoon water
- 6 raw dyed Easter eggs optional
- Rainbow nonpareils
Instructions
- Dyeing Eggs (optional): If you'd like to make Easter bread with dyed eggs in the middle, start by dyeing uncooked eggs in your preferred method, letting them dry fully before cooking in this recipe. Skip this step if you'd rather use undyed eggs or just not use the eggs at all.
- Mixing the Dough: Add yeast, sugar, salt, and 1 cup (125g) of the flour to the bowl of a stand mixer and whisk to combine.
- Pour the milk into a small saucepan and add the butter. Set the saucepan over low heat on the stove. Whisk until the butter melts and the milk is warmed. Aim for the milk/melted butter mixture to reach between 110-115°F (43-46°C). If it's hotter than that, take the pan off the stove and let it cool for a few minutes until it's down in that range.
- Pour the warmed milk/butter into the stand mixer bowl over the the dry ingredients and whisk well to combine evenly.
- Add the eggs, lemon zest, anise extract, and vanilla extract to the stand mixer bowl and mix everything on low-medium speed with the paddle attachment for 2 minutes.
- Add 3 cups of flour (375g) to the bowl. Fit the stand mixer now with the dough hook attachment and knead on low-medium to medium speed for 10 minutes. The dough will be sticky so you'll need to add additional flour during this time. Add one additional Tablespoon of flour at a time, then let it knead in for a couple of minutes. Use just enough so that the dough is smooth and just a tiny bit sticky. Go slowly with the flour as the dough may look stickier than it actually is. I usually add up to 3 or 4 Tablespoons of flour at this point, but the amount you need may vary.
- First Rise: Turn out the dough into a large greased bowl and cover it snugly with plastic wrap. Let the dough rise in a warm place until doubled in size, at least one hour.
- Shaping the Rings: Punch down the dough and turn it out onto a very lightly floured work surface. Hand knead the dough for a few minutes (you shouldn't need more flour, though if it's sticking too much add just a sprinkle). Let the kneaded dough rest for a few minutes before continuing.
- Divide the dough into 12 equally-sized pieces. Roll each piece into even ropes, about 15-inches or so long and 1-inch wide. Pinch the ends of two ropes together, twist them around one another, then secure the ends into a ring by pinching them closed.
- Place the six rings on large parchment-lined baking sheets. I equally space three rings on each roughly 17-inch x 12-inch sheet, using two baking sheets in total.
- Second Rise: Drape plastic wrap over the shaped dough rings to cover, then let them rise in a warm place until doubled in size, about one hour. Toward the end of the rise time, arrange two racks in your oven with one just below the center and one just above. Heat the oven to 350°F (177°C).
- Decorating the Bread: Once risen, discard the plastic wrap. Place dyed Easter eggs into the center of each ring.
- Whisk together one large egg yolk and one teaspoon of water in a small bowl and brush the egg wash onto the tops and full sides of the dough rings, taking care not to get it on the center egg (this will lead to color bleeding). Sprinkle rainbow nonpareils over the egg wash.
- Baking: Bake for 23-25 minutes, switching the racks the pans are on halfway through to promote even browning. The Easter breads are done when the center of the thickest part of the loaf reaches 190°F (88°C). Each loaf will be a deep golden-brown and will also have a noticeably hollow sound when you knock on the bottom.
- Transfer the baked bread to a wire rack right away to cool.
Notes
- Ideal Rising Conditions: Proof the dough in a warm place for optimal rising, ideally around 75-78°F (24-26°C). A good option is to preheat your oven to its lowest temperature, then turn it off and let it cool off some until it's around that range. Place the rising dough inside, either closing the door entirely or leaving it open a crack. You can also place the dough on top of a running dishwasher or dryer.
- Prep-Ahead Tip: Instead of letting the dough do its first rise at room temperature, you can instead place it in the refrigerator to rise for 8-12 hours. Cover it snugly with plastic wrap to prevent the dough from drying out, and after it rises let it sit at room temperature to warm up for a bit before continuing with the recipe.
- Nonpareils: After a day or so, it's inevitable that the rainbow nonpareils will start to bleed onto the bread. If that bothers you, you can use white nonpareils or omit them entirely if you like.
- Storage Instructions: Snugly wrap breads without the center egg in plastic wrap once cooled and store in an air-tight container at room temperature for up to 3 days. They can also be frozen this way. If adding the center cooked egg, refrigerate the loaves with the eggs (or remove the eggs from the bread to refrigerate) within 2 hours after baking. Do not store the breads with whole cooked eggs at room temperature.
- Reheat Instructions: Wrap baked Italian Easter breads in foil to prevent excess browning, then place in a 325-350°F oven for 15 minutes or so, or until warmed throughout and just becoming fragrant.
Would you like to save this?
Plus receive periodic recipe newsletter emails.
Nutrition
Nutritional information is provided as an estimate. As it can vary due to many factors (brands used, quantities, etc.), we cannot guarantee its accuracy.
Food Safety and Nutrition Disclaimer
Nicole says
This recipe is a keeper! I found the instructions simple to follow. The breads have a great taste, lightly sweet. Thanks for sharing!
Allynne says
Beautifully done! Well worth the effort for something this delicious and festive!
Alyssa says
I agree!