
This onion garlic bread recipe could not be easier to make. With an enhanced garlic flavor to stand up to the extra flavorful bread, this fun twist on garlic bread rolls features two types of garlic and plenty of Parmesan while crisping up to just the right texture.

On a semi-regular basis my mom has always managed to surprise me with something cooking-related. Pizza crust as sandwich bread, suggesting powdered honey in a recipe to get the flavor without the stickiness, serving breaded chicken cutlets as gigantic 'Italian chicken nuggets', etc.
This onion roll garlic bread is another. I mean, DUH this is going to be delicious. Why had the thought never crossed my mind? If you love bakery-fresh onion rolls and never met a garlic bread you didn't go for (roasted garlic bread is our house standard), you'll want to put this on your next Italian night menu.
Something to Note: This is not the same thing as just adding your regular garlic bread topping to onion rolls instead of your standard wide loaf of bread. This recipe requires an extra garlicky topping to hold its own against the onion roll flavor, otherwise it can be a little bland. I tested this recipe 3-4 times, increasing the garlic each time, until the flavors balanced each other just right.
Recipe Ingredients
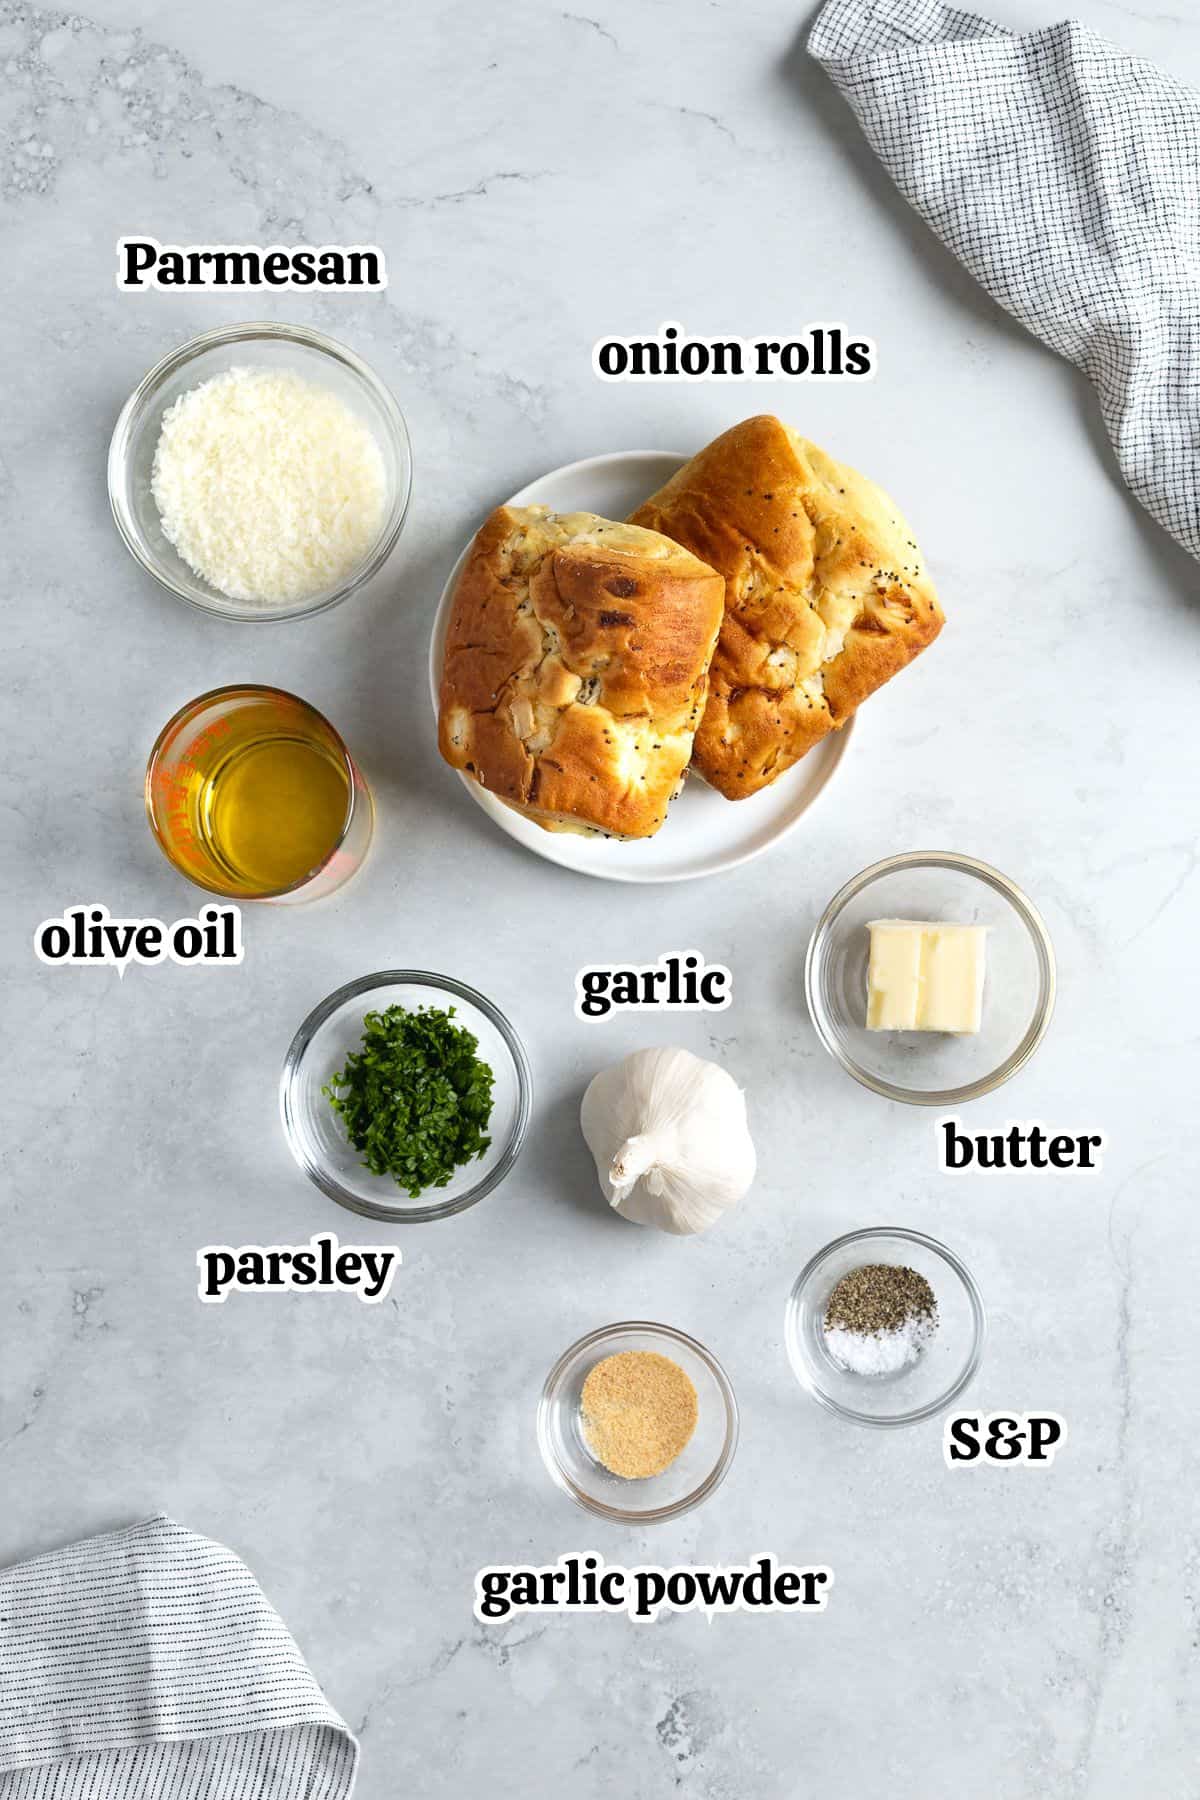
- Onion rolls: These incredibly soft and moist bakery rolls are flavored with shredded pieces of rehydrated onion and poppy seeds. I love to sub them in for buns (seen here in this slow cooker pulled pork sandwich). It's no surprise the onion rolls I grew up on in the NY metro area were simply a cut above, but the ones I picked up here in a large Southern U.S. chain grocery store were just fine.
- Butter & Olive Oil: I like to replace a portion of the typically-used melted butter here with extra-virgin olive oil for a complementary flavor.
- Parmesan: For that salty, slightly tangy flavor we love in Italian food. Pecorino Romano is a great substitute. Shredding your own wedge is ideal for its more present flavor, but choosing a pre-shredded tub from the refrigerated deli case is a good second pick.
- Garlic: Three medium fresh garlic cloves, pressed or minced as finely as you can. Please do not use jarred garlic as the flavor is different.
- Garlic Powder: To add another layer to the garlic flavor. Try swapping in a portion with roasted garlic powder, if you have it, for a slight but tasty variation.
- Parsley: A classic fresh herb accompaniment that brings a pop of color.
Easy Recipe Steps

- Step 1: Stir together the melted butter, olive oil, fresh garlic, parsley, garlic powder, salt, pepper, and half of the Parmesan.
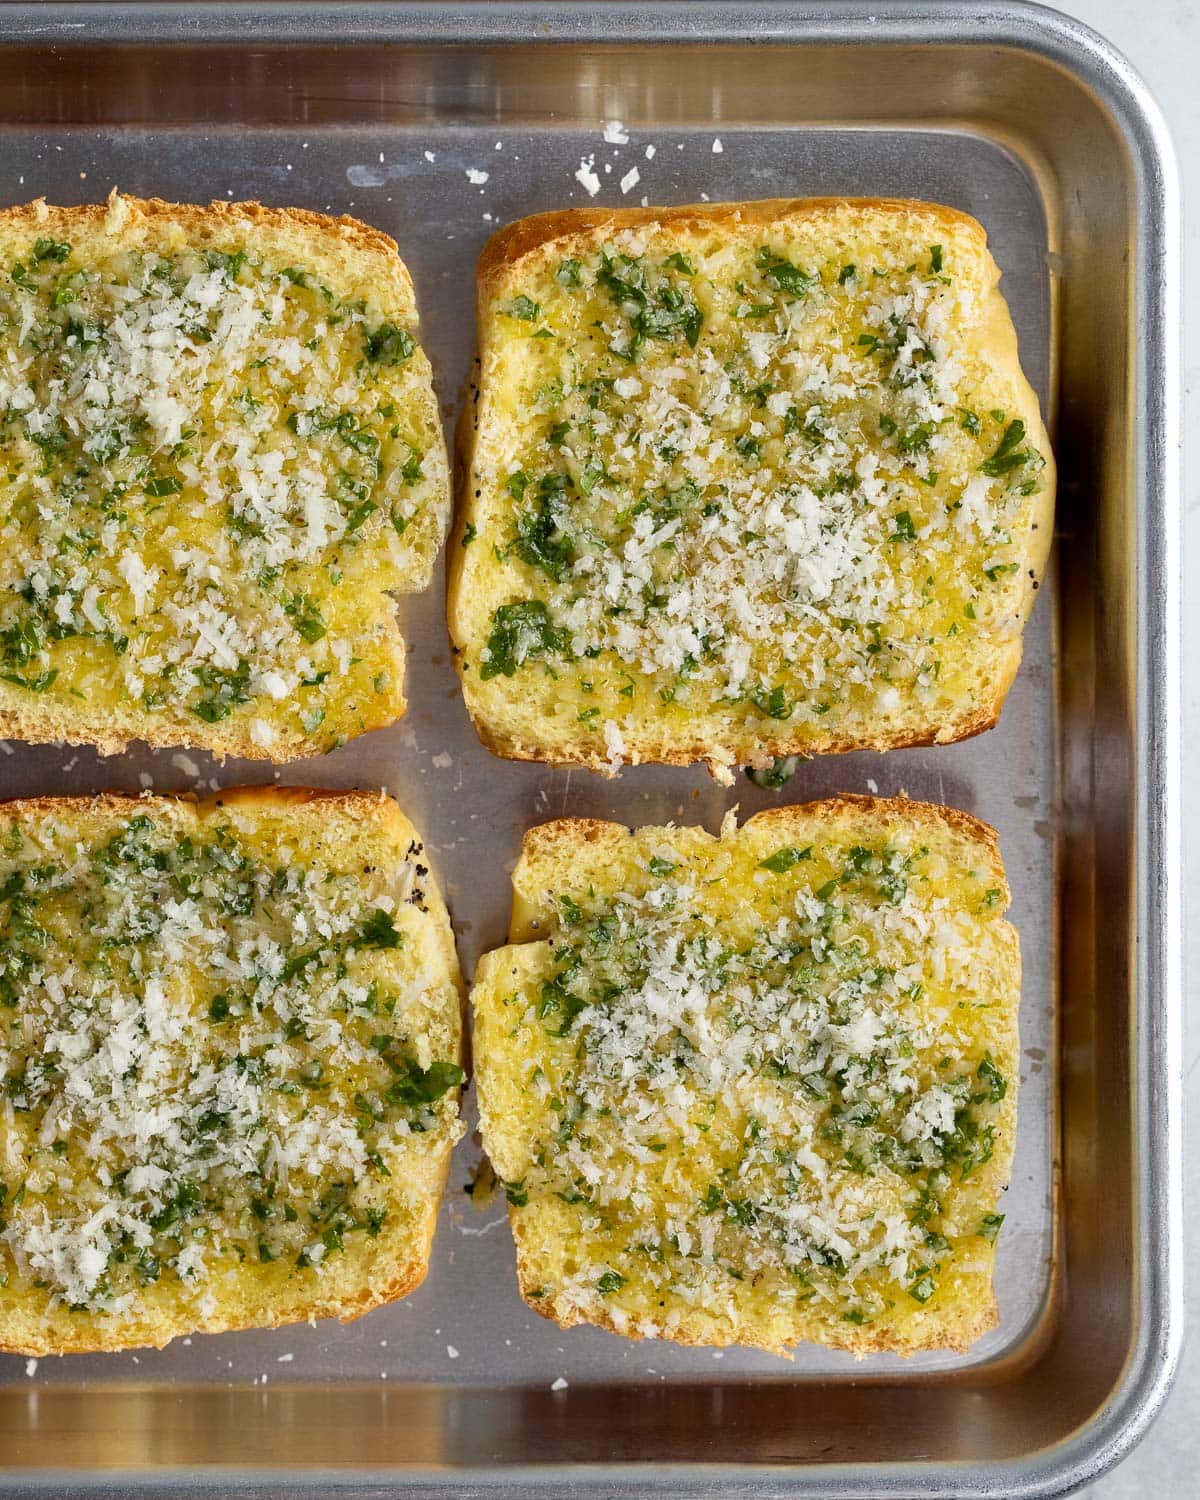
- Step 2: Halve the onion rolls and place them close together on a sheet pan. Evenly spread the butter and oil mixture over the cut surfaces to the edges.
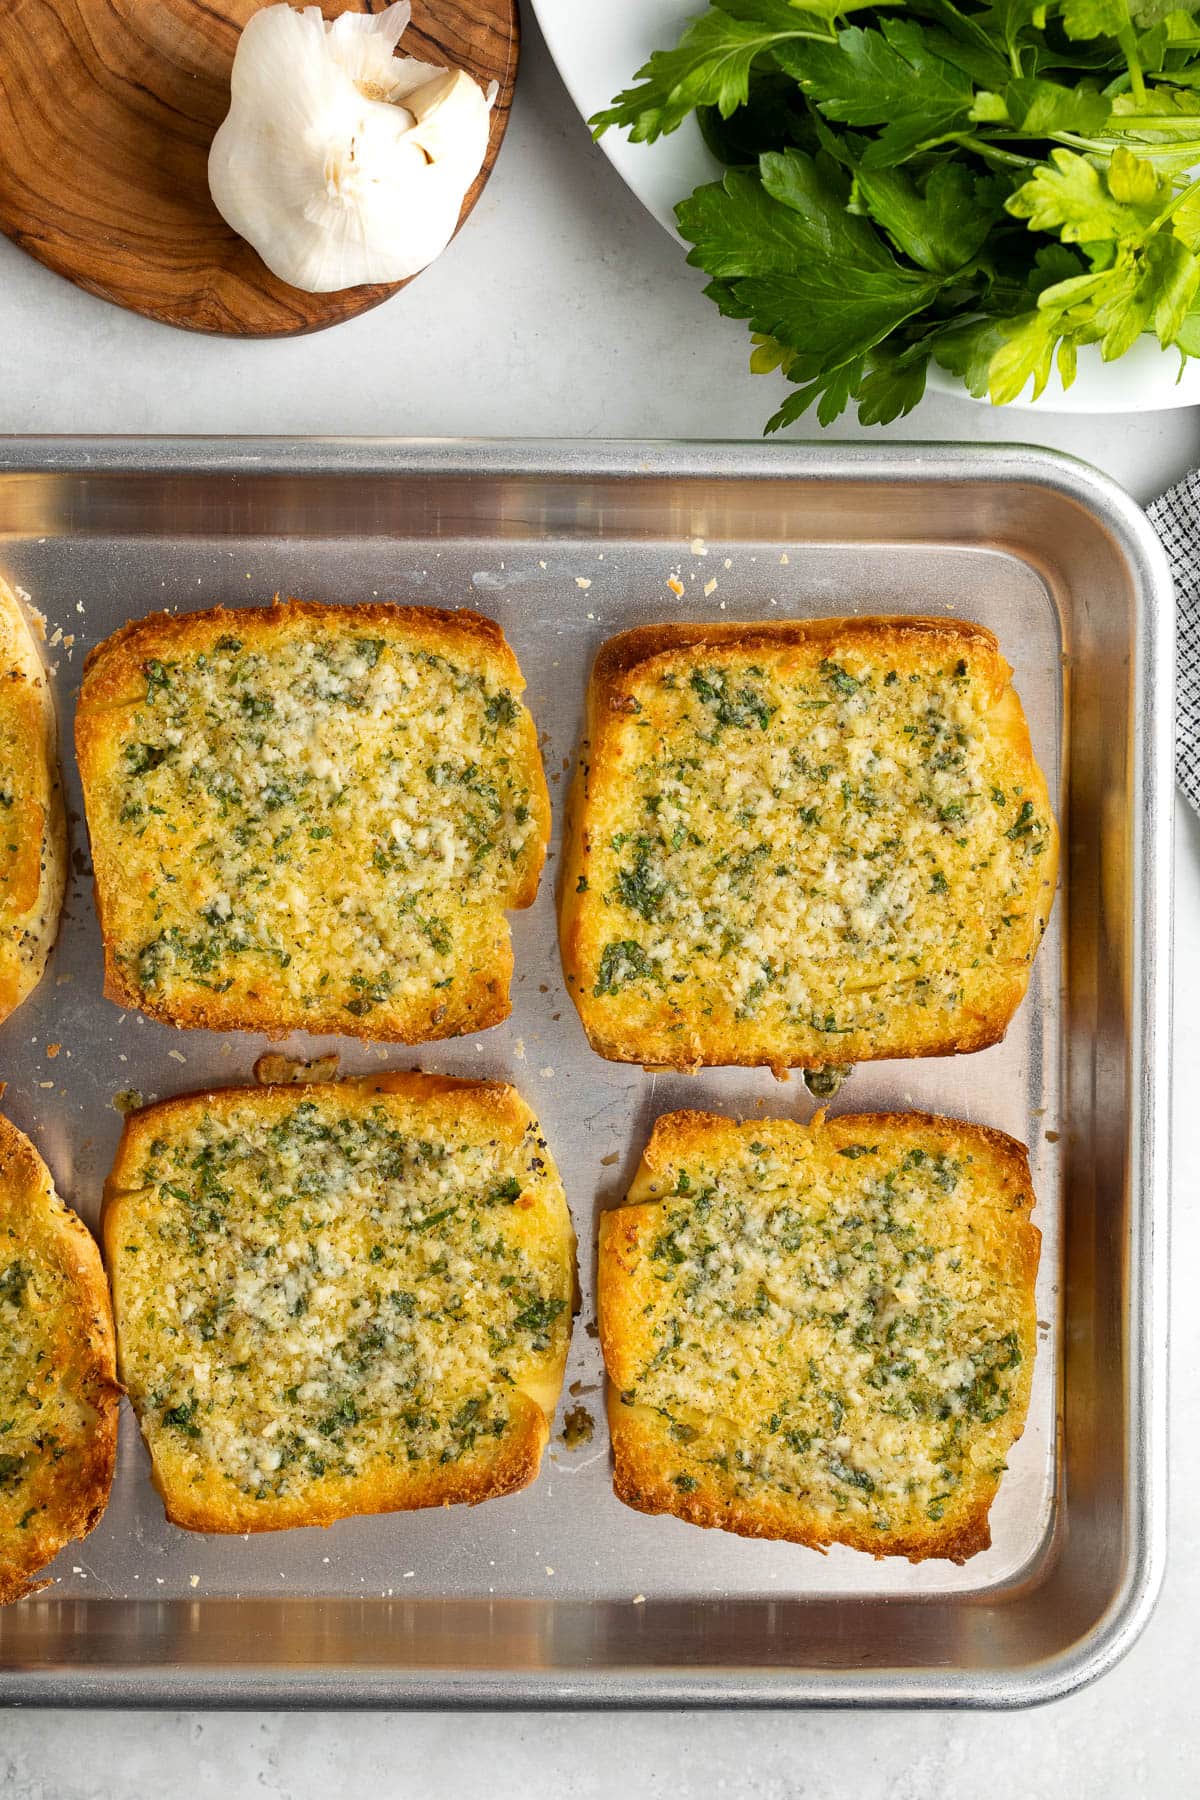
- Step 3: Bake at 350°F for 10-12 minutes, then switch the oven to the broil setting for about a minute on low, keeping a constant watchful eye as things move very quickly under the broiler. Remove the onion garlic bread right when the edges turn golden-brown to your liking.

Recipe Tips and Tricks
- Can't find onion rolls? Nothing beats a real deal bakery onion roll, but I've noticed onion and poppy seed topped hamburger buns in the bread aisle that would likely be a good second option.
- Broiler safety: Make sure the pan you're using to make this onion garlic bread is broiler-safe. For this reason I do not use parchment paper or aluminum foil when making this recipe. The rolls go right onto the aluminum sheet pan.
- Broiler level: My oven has low and high broiler settings, of which I choose low for this recipe. It still goes quickly, but gives you a little breathing room to prevent over-browning.
- Slicing into servings: The rolls are sliced in half width-wise at the start of this recipe, then I slice each square in half diagonally once done to serve them in wedges. If scaling this recipe up or down, each onion roll cut this way yields four wedges of garlic bread.
- Storage/reheating instructions: Once cooled, store leftover garlic bread in an air-tight container or bag with all excess air pressed out. Refrigerate for up to 3 days. To reheat, place leftover slices on a sheet pan and tent pieces in aluminum foil. Reheat at 350°F for 10 or so minutes until crisped and warmed. They will become soggier if reheated in the microwave.

More Recipes for Garlic Lovers


Did you enjoy this recipe? I’d love for you to leave a star rating and a comment review in the recipe card below!

Easiest Onion Garlic Bread
Ingredients
- 3 onion rolls square, from the bakery section
- 2 Tablespoons unsalted butter melted (or salted)
- 2 Tablespoons olive oil
- 3 medium garlic cloves pressed
- 1 teaspoon finely-chopped fresh parsley
- ¾ teaspoon garlic powder
- Big pinch of fine salt (lessen or omit if using salted butter)
- Ground black pepper
- ¼ cup finely-shredded Parmesan or Pecorino, divided
Instructions
- Preheat oven to 350°F and slice each onion roll horizontally into two halves. Arrange the six sections cut-side up next to one another on a rimmed sheet pan in a single layer. Set aside for now.
- Melt butter in a bowl, then add the olive oil, pressed garlic, parsley, garlic powder, salt, and pepper and stir to combine. Add half of the Parmesan (about two tablespoons) and stir evenly as the mixture thickens up a bit.
- Evenly distribute the melted butter mixture over the onion rolls, spreading it out right to the edges so the bread doesn't dry out. Sprinkle the remaining Parmesan evenly over top of each piece.
- Bake on the middle rack for 10-12 minutes, then briefly broil for a minute, or however long it takes for the garlic bread to turn golden-brown and crisp to your liking. Keep a close eye as this can happen quickly.
- Remove from the oven and slice each square in two diagonally to end up with 12 pieces. Serve immediately.
Notes
Would you like to save this?
Plus receive periodic recipe newsletter emails.
Nutrition
Nutritional information is provided as an estimate. As it can vary due to many factors (brands used, quantities, etc.), we cannot guarantee its accuracy.
Food Safety and Nutrition Disclaimer
Comments
No Comments