
You only need very simple ingredients to make these vanilla-forward and rich butter spritz cookies. With no-chilling required, detailed tips on using a cookie press without fuss, and a special tricks for extra flavorful and festive cookies, this old-fashioned cookie recipe produces a high yield, making them a favorite for Christmas cookie trays and exchanges.

Known in my house simply as "butter cookies", butter spritz cookies have been a holiday staple for my family since before I was born. With their rich and not too sweet flavor, they certainly live up to their nickname.
Spritz cookies are made with a cookie press fitted with a variety of shaped disks to (just about) effortlessly produce the small and festive designs they're known by. You'll love spritz cookies if, like me, you get the sweats thinking about trying to decorate sugar cookies with royal icing, roll a Bûche de Noël, or make any other kind of Christmas dessert that requires artistic skill.
P.S. Another fun holiday variation are these gingerbread spritz cookies if you'd like to keep the cute-but-easy vibe going.
Why You'll Love These Cookies
- No chilling - Butter spritz cookie dough is quick and easy to prepare, uses basic ingredients, and requires no chilling.
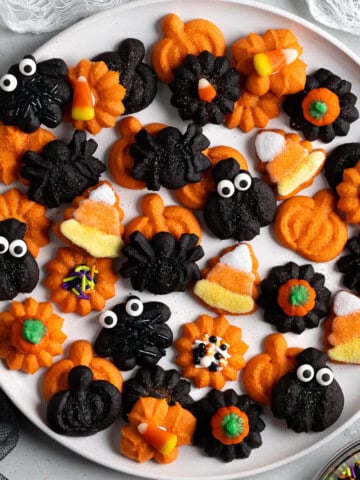
- No artistic talents needed - They're a fun and fairly low-effort dessert to decorate for the holidays: see these Valentine's Day spritz cookies, Halloween spritz cookies, and of course Christmas. Shaped disks, food dye, and sprinkles work wonders if you're not artistically-inclined and provide a big payoff.
- High yield recipe - One batch makes a lot of cookies quickly (around 7-8 dozen), making butter spritz cookies a great Christmas cookie exchange recipe.

#1 Tip for the Best Spritz Cookies
Here's where this spritz cookie recipe differs from many others: let the cookies bake until the bottoms and edges brown, not just "until set". This will be just a minute or two longer.
The Maillard reaction that happens when the cookie bottoms/edges bake long enough to turn golden-brown provides a MUCH deeper flavor than that of cookies that were pulled before it takes place (which I tried once - key word "once"). I have over 30 years of experience eating these cookies and believe this with my whole heart! The richer flavor is unmatched.
Recipe Ingredients

- Butter: Ensure the butter is softened for optimal structure and consistency, which occurs when you can press into a stick and your finger leaves an indent with some resistance. This can take anywhere from 30-60+ minutes depending upon your kitchen temperature. Butter is too soft if your finger easily presses through the stick, or if the butter is shiny and greasy and very malleable - place it back in the fridge to firm up to the right amount.
- Sugar: Two-thirds of a cup of granulated sugar ensures these old-fashioned spritz cookies aren't overly sweet.
- Vanilla Extract: Two teaspoons is the right amount for the vanilla to shine through this simple, buttery cookie. You can sub in a portion of almond extract if you like.
- Food Dye: Green for trees and wreaths, or red if you'd like to transform a flower shape into poinsettias. Gel food dye is recommended over liquid formulations as you'll need less of it to achieve a vibrant color. This introduces less moisture into the dough and prevents stickiness.
- Sprinkles/Decorations: Lots of variations here (detailed below). Think sanding sugar, non-pareils, and festive "jimmies" blends, as well as red and green candied cherries.
Step-by-Step Instructions

- Step 1: Cream together softened butter and sugar for several minutes until light and creamy.

- Step 2: Mix in the egg and vanilla extract until well combined.

- Step 3: Blend in the flour and salt, switching from an electric mixer shortly into the process to using your hands to lightly "knead" the mixture together until smooth and soft. The dough should not be sticky.

- Step 4: Load the dough into your cookie press according to instructions, choose a shaped disk, and press out cookies on an ungreased aluminum baking sheet.

- Step 5: Decorate with sanding sugars, non-pareils, candied cherry halves, or sprinkles that will not melt and bleed when heated.

- Step 6: Bake at 400°F for 7-10 minutes, or until golden to golden-brown around the edges and on the bottoms. Start checking them at the earlier end of that range to ensure they don't burn as all ovens operate a little differently. Let cookies cool on the pan for 5-10 minutes before transferring to a wire rack to finish cooling.
Spritz Cookie Decorations
- Trees and Wreaths: Classic spritz cookies for Christmas. Dye the dough green, press corresponding shapes, and sprinkle white sparkling or green sanding sugar over top before baking.
- Flowers: Choose one of the flower shapes provided with your cookie press and nestle half of a red or green candied cherry in the center before baking. You can usually find these cherries in stores starting in early/mid-November. Any extras? Make Christmas rice krispie treats or chop to use in fruitcake cookies.
- Sanding Sugar/Non-Pareils: Various sanding/sparkling/shimmer sugars in red, green, and white, as well as holiday color non-pareils are easy ways to make these Christmas spritz cookies festive. They can be sprinkled on the cookies before baking.
- Shaped Sprinkles/"Jimmies": Festive sprinkle blends that include pieces shaped like mini Christmas trees, snowflakes, red holly berries/round baubles/stars (so cute on green trees!), etc. These will likely melt and bleed in the oven, so decorate the spritz cookies with these only after they're baked and cooled. They can be attached with glaze or a small dab of cookie icing.

Recipe Tips and Tricks
- All cookie presses have their quirks: Sometimes the process can just be finicky. Two or three cookies in a row don't come out well, but then the next one will release perfectly. Take advantage and keep the streak going - crank them out when the conditions are right.
- Cram 'em in: Spritz cookies barely spread, so you can place them as close together as your cookie press will allow on the baking sheets.
- Know your sprinkles: Some can be applied to the cookies before baking (sanding sugar, non-pareils) while others will melt/color bleed if heated (decorative "jimmies") so are best reserved for decorating once the cookies have cooled. If in doubt, do a test cookie to see how they fare in the oven.
- Gel food dye is recommended: You'll need less gel food dye than liquid food coloring to achieve a similarly pigmented result, which introduces less moisture into the dough. That's a good thing, as more moisture = stickiness. If all you have is liquid and this happens to you, work in an extra sprinkle of flour or consider a brief chill in the refrigerator until the stickiness reduces.
Spritz Cookie Recipe Troubleshooting

- The dough is sticky, not just soft: Too much liquid may have been added to the dough (for instance, if using liquid food dye and not gel) or under-measuring flour. Gently work in extra flour a little bit at a time until the stickiness lessens.
- The dough is crumbly and won't come together: Use your hands to lightly knead the dough to make it come together more efficiently. Measure the flour correctly (by weighing or using the spoon-and-level method) so too much doesn't accidentally get added.
- The dough won't stick to the sheet pans: - Make sure the dough is not too cold. If you prepared the spritz cookie dough in advance and refrigerated it, let it sit at room temperature until the chill wears off before pressing. Try using aluminum baking sheets and not ones with a non-stick coating.
- The shape didn't come out well: Scrape misshapen cookie dough off of the pan and add it back to the bowl to try again. Even with a great dough, I strongly believe that sometimes there's no rhyme or reason as for why certain shapes aren't working on a particular day.
- The cookies spread too much: Use fresh pans (cold and not warm/reused ones) that are totally ungreased - no parchment paper, silicone baking mat, etc.
- The bottoms browned too quickly: I recommend using a light metal pan for this spritz cookie recipe as dark metal pans absorb heat more efficiently, leading to much faster browning. You can see this in action via the above photo. The two toasty trees on the left were baked at the same temperature, on the same spot of the same oven rack, on a fresh (cold) pan, with the same dough for one minute less than the other cookies. The difference? I used a dark metal pan and not a light one.

Recipe FAQs
Yes. Spritz cookies aren't especially delicate and don't become stale quickly so they're good Christmas cookies to mail. I have experience both sending and receiving spritz cookies via U.S. mail and while maybe one or two of the bottom ones will have a broken corner, as long as they're not left to rattle around a half-empty container or shifting around a box without padding, they'll be fine.
Yes, they freeze really well! Wait until they've cooled and store in an air-tight container or freezer bag with all excess air pressed out. They'll stay for months, but over time, like all baked goods, may begin to take on tinge of slightly staler, freezer burnt flavor. If making spritz cookies ahead of time for Christmas, I recommend freezing them for no longer than a month before serving for the best flavor.
Technically, yes. I've done this with the last little blob of dough when I didn't feel like reloading the press. Roll a small gumball-sized ball and press it on the pan with your hands into an even, thin layer. I don't recommend doing this method for the whole batch as it would take quite awhile and you wouldn't get the advantage of all of the cute shapes.
Ooh do I love a metal cookie press. I grew up making spritz cookies on my mom's Marcato press that handled like a dream for decades until the mechanisms gave out. However metal presses are harder to find and more expensive, so I make and test all of my blog spritz cookie recipes with the more common, plastic-tubed oxo cookie press. While it's not perfect (my standards here are very high!), it certainly works well. I have no experience with an electric cookie press.
My preference for disks is thin metal for their reliable precision, but I've used third-party holiday sets that are super-thick hard plastic with pretty good results, too.
Related Recipes


Did you enjoy this recipe? I’d love for you to leave a star rating and a comment review in the recipe card below!

Butter Spritz Cookies
Ingredients
Cookie Dough:
- 1 cup (8 ounces, 226g) unsalted butter softened
- ⅔ cup (133g) granulated sugar
- 1 large egg
- 2 teaspoons vanilla extract
- 2 ½ cups (313g) all-purpose flour
- ½ teaspoon fine salt
Decorations (mix and match):
- Green gel food dye
- White, red, and green sanding/sparkling sugar
- White, red, and green non-pareils
- Red and green candied cherries halved
Instructions
- Situate an oven rack in the middle of the oven and preheat the oven to 400°F.
- Cream together the softened butter and sugar with an electric mixer for 2-3 minutes, until light, smooth, and creamy. Add the egg and vanilla extract and mix well until evenly combined.
- Add the flour and salt to the bowl and start incorporating with the electric mixer. The mixture will first appear crumbly, but partway through switch over to gently kneading with your hands as a soft, smooth dough develops. It should not be sticky (but if it is, work in a small sprinkle of flour).
- If you'd like to dye a portion of the dough green, portion it out into a separate mixing bowl and mix in the coloring.
- Choose a disk shape and load your cookie press according to the instructions. Press cookies onto ungreased (no parchment paper, no silicone baking mat) sheet pans, switching out disk shapes as you like. These cookies don't spread so place them as closely as the press allows.
- Add any oven-safe decorations: place candied cherry halves in the center of a flower, sprinkle cookies with sanding sugar or non-pareils, etc.
- Bake for 7-10 minutes, or until the edges and bottoms turn golden to golden-brown. Start keeping a close eye on them near the beginning of the range as they can become overly toasty in a hurry. Let the cookies cool on the sheet pan for 5-10 minutes before cooling completely on a wire rack. Add any non-oven safe decorates with cookie icing or glaze only once the cookies are fully cooled.
- Store cooled cookies in an air-tight container for up to a week, or freeze for several months.
Notes
- Use light metal pans vs dark ones. Dark pans absorb heat more efficiently and result in quicker browning, making it easier for cookies to burn. If using dark pans, check the cookies earlier than the listed time range, and often.
- Use cold (not still-warm) pans. This helps the cookies stick when pressed out and prevents excess spread.
- Don't chill the dough. Dough that's too cold will have a hard time separating from the tube and sticking to the pan.
- Test your decorations. Sanding sugar, non-pareils, and candied cherries can be added to cookies before baking, while longer rod sprinkle blends/jimmies may melt and cause color bleeding if heated. If you're not sure how your particular kind will fare, decorate one cookie as a test and see what happens.
Would you like to save this?
Plus receive periodic recipe newsletter emails.
Nutrition
Nutritional information is provided as an estimate. As it can vary due to many factors (brands used, quantities, etc.), we cannot guarantee its accuracy.
Food Safety and Nutrition Disclaimer
Jeanne-Renée says
These spritz cookies came out beautifully!!! First time using a cookie press. It was fun and they’re so delicious! I added sprinkles and they’re gorgeous!
Alyssa says
I'm so happy they were a success for you, thank you for letting me know how they went!
Alida says
This recipe worked out perfectly. First time using a cookie press and it was effortless. Will definitely use this recipe again!
Alyssa says
I'm glad to hear it! Thank you for your review. 🙂
LBI Terri says
I love this recipe for butter spritz cookies. They are delicious and the batter works well with my cookie press. It is a keeper!
Alyssa says
I'm so happy this spritz recipe was a success for you! Thank you for sharing your experience!